How to Generate Blog Posts in Your Style & Tone with AI

Like most content writers worth their weight in SEO, you’ve undoubtedly tried the GPT-4 for generating blog posts.
And like the rest of us, you’ve been disappointed by it. Yes, it can produce content, and some of it sounds pretty good, but all of it sounds like ChatGPT. Then, when you try to steer it with a prompt, it goes too far in that direction and is hard to dial into your specific brand’s style and tone.
“Sigh, if I could just show it my blog and our library of past posts, then it would ‘get’ me.”
Of course, with longer context windows, you can copy and paste samples of your work to show the LLM how to write. This is called in-context or few-shot learning. But the price of tokens can add up fast through the API when you have to stuff the prompt every time, and it’s easy for it to veer off the rails with too many instructions.
Fortunately, there is an easier way.
Fine-tuning lets you train the model itself to perform better at your writing task.
Even with a smaller model like GPT-3.5 Turbo, we can train the LLM to generate blog posts that read much better than the ones GPT-4 can produce.
Cost comes down. Speed goes up. And most importantly, quality is on point.
That’s right, we can generate 3,000 word blog articles that match our style and tone using a custom-trained AI model.
Here’s how you do it.
1. Export your blog articles
First, we need to get our blog articles in a format we can work with.
For this, we’ve chosen markdown formatting.
Markdown is a very common way to format text. It’s used on many Content Management Systems already and it’s a convenient way to show our AI model what we’ve created in the past and also to generate new posts.
We don’t want the AI to get hung up on HTML syntax or anything more complicated than just the basics like headings and lists, which makes markdown a perfect choice.
To get my blog articles from Wordpress, I exported the posts and then used a wordpress-export-to-markdown script to convert the files in bulk to markdown.
Exporting from Wordpress to Markdown
To export your Wordpress articles, first go to Tools and then Export.
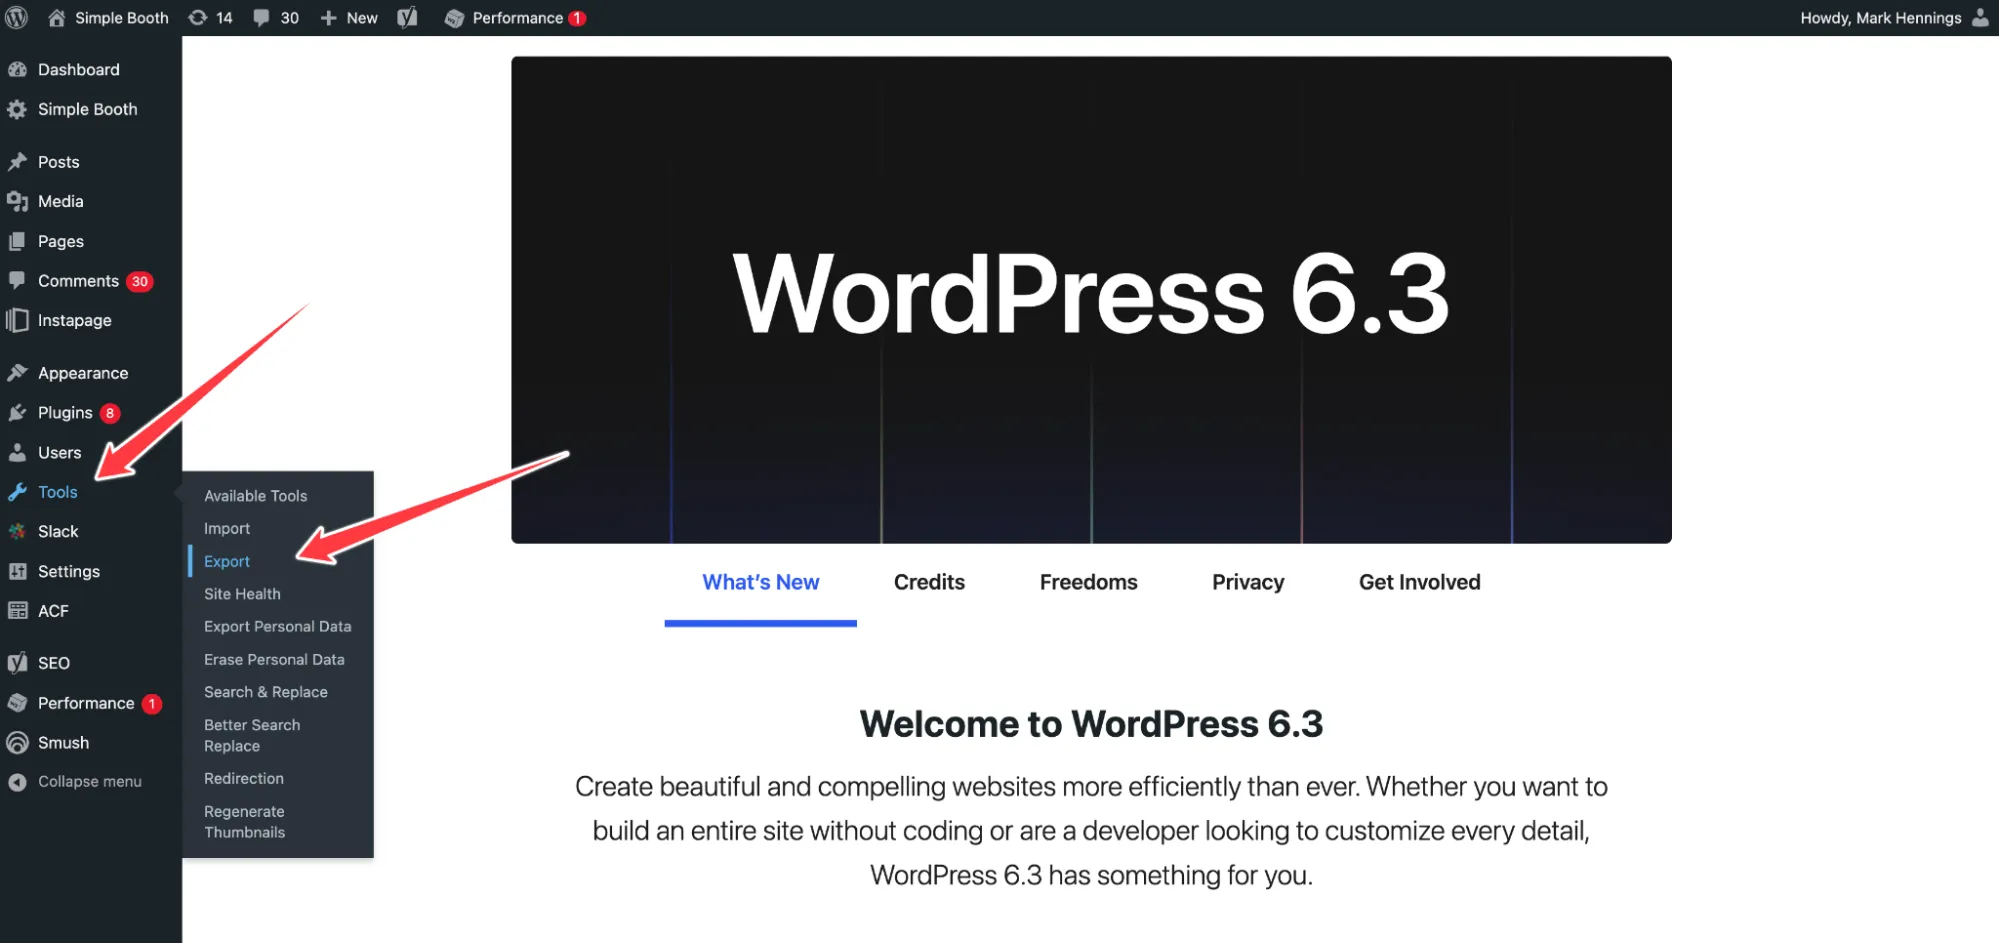
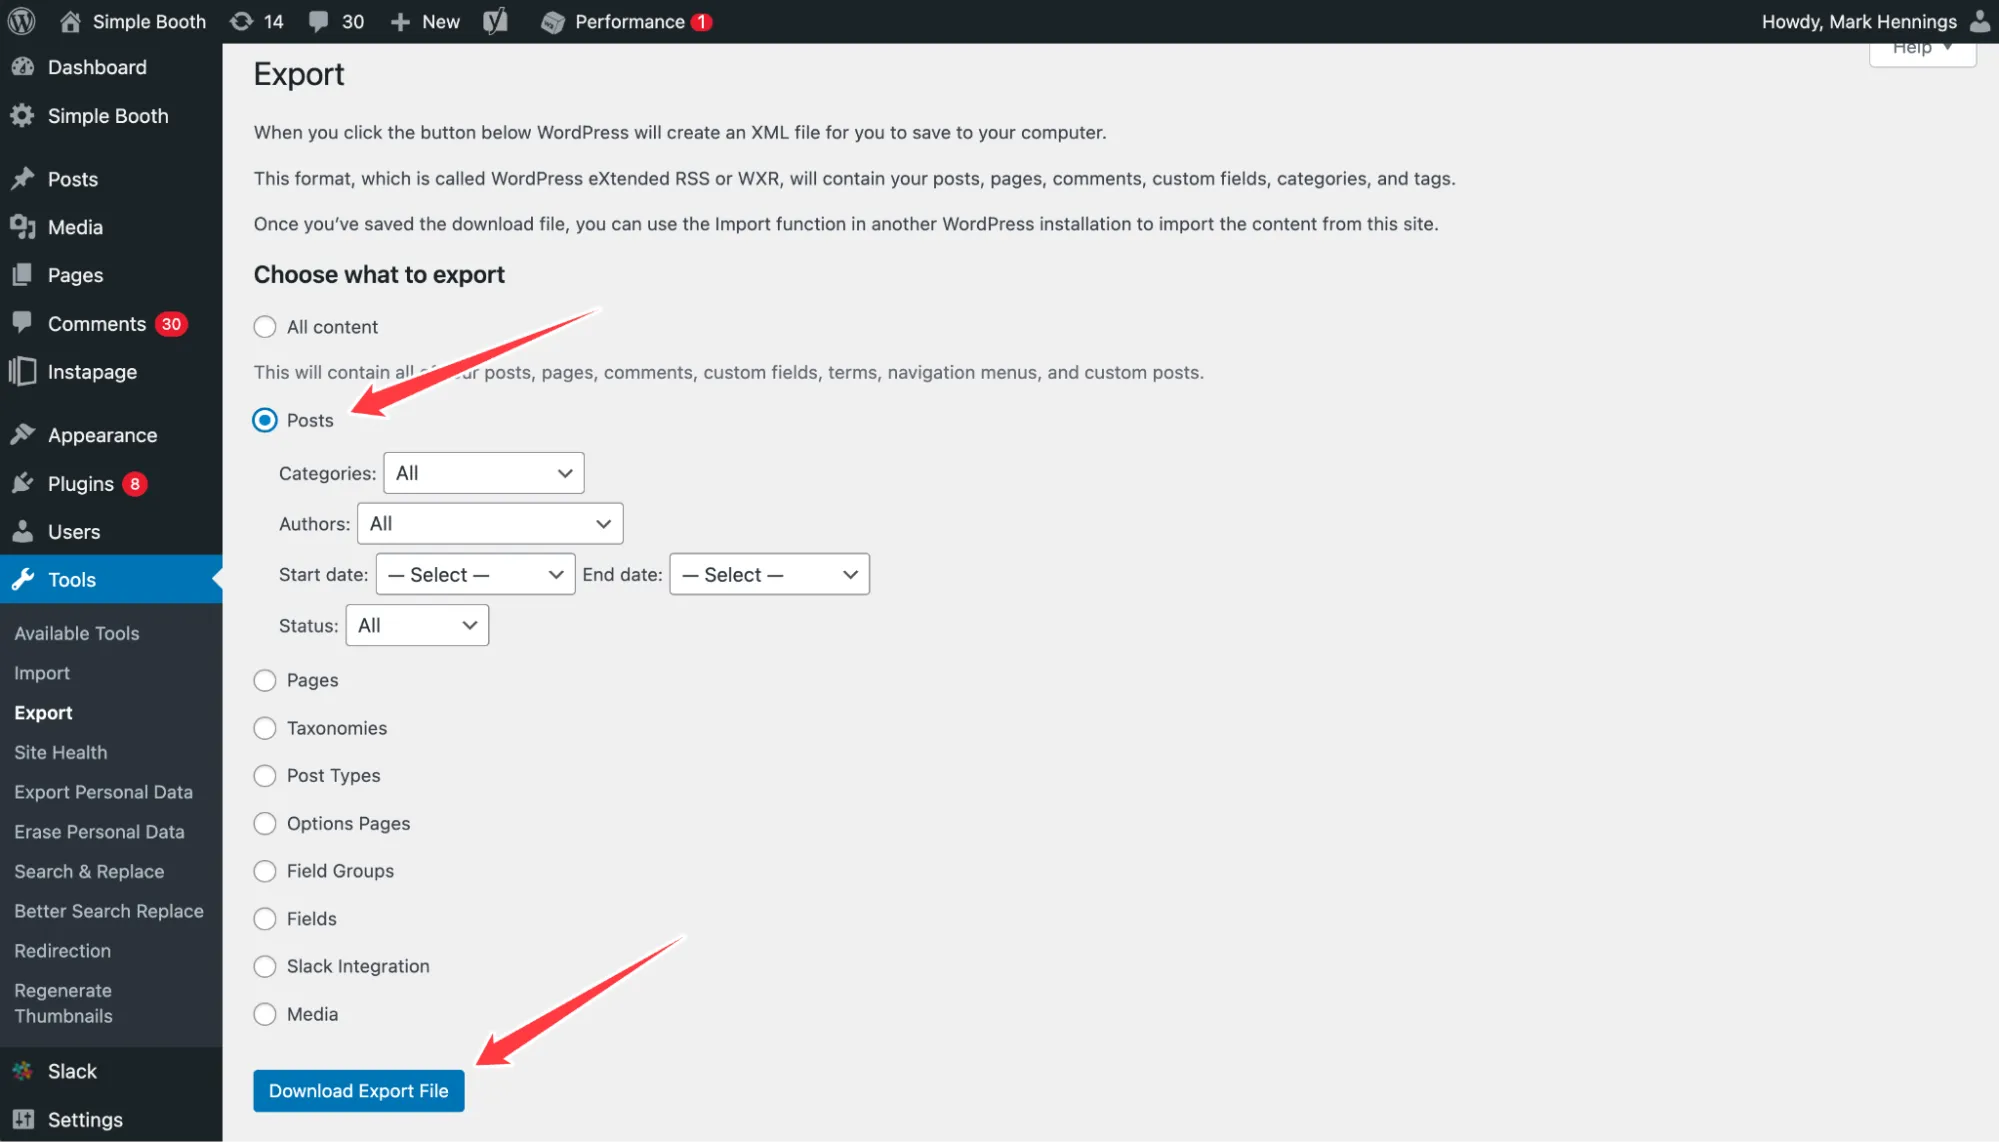
Next, select Posts. If you have a huge library of posts, you could start with articles from just one category, from a top author, or more recent ones that reflect your latest writing style.
Then, press Download Export File.
That gives us an XML file, which is not exactly what we want. But we can get there.
Note: PC users, please forgive me — I used to be one of you, but I’m going to proceed with Mac instructions here because that’s what I have now.
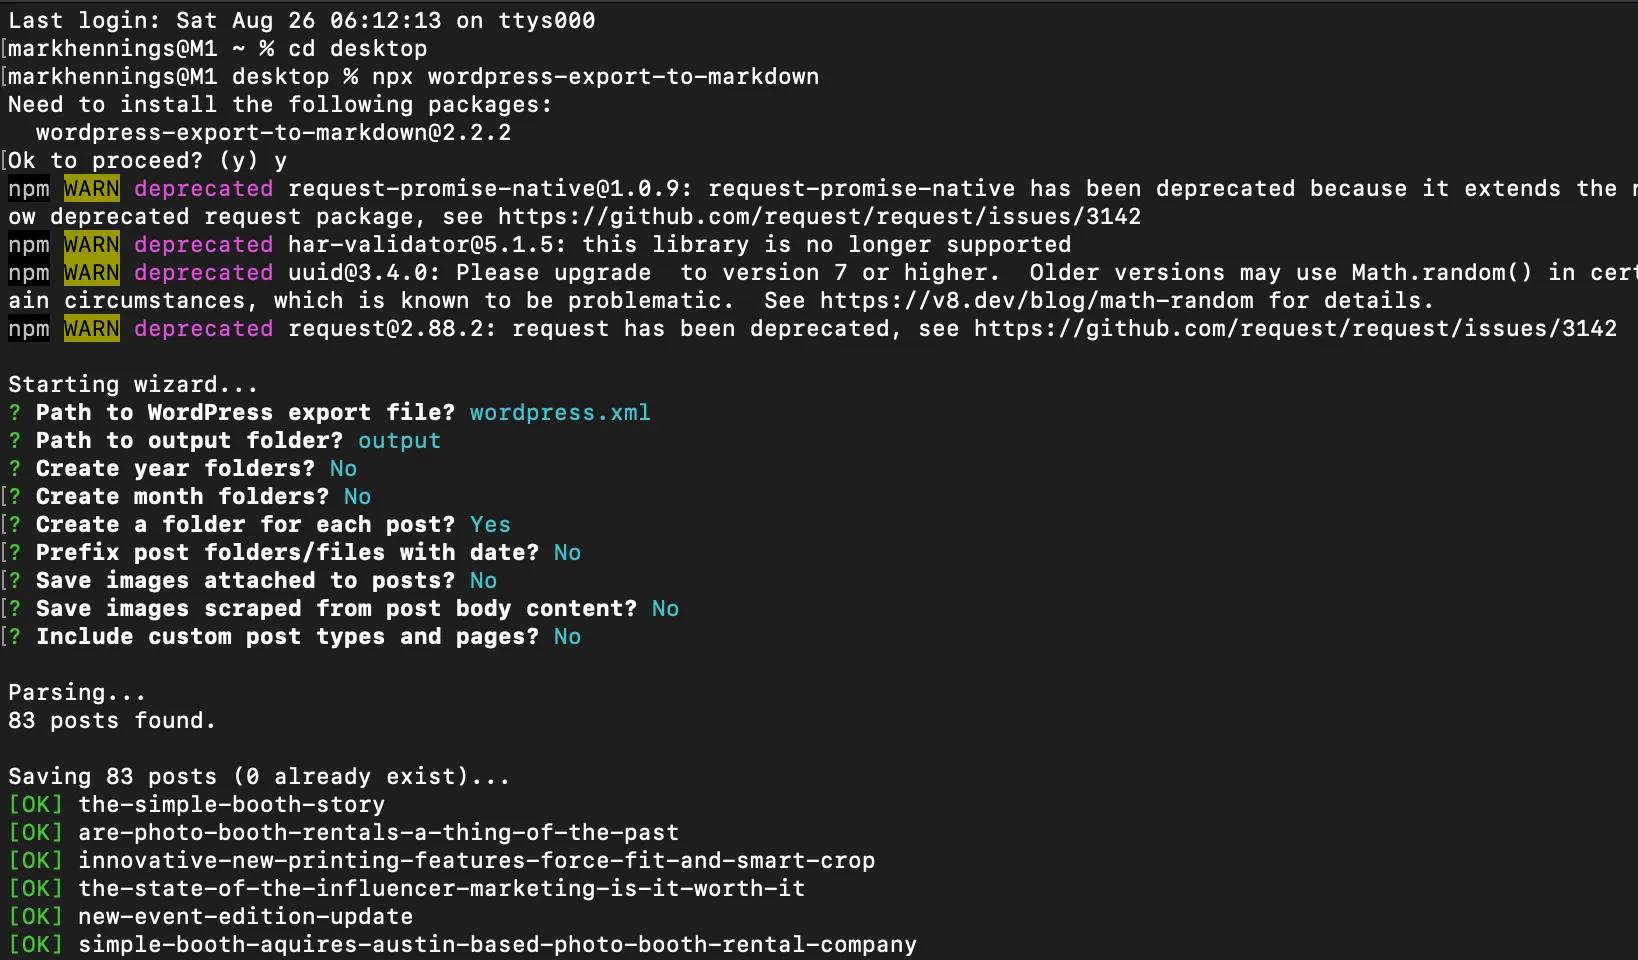
Rename your posts export file to “wordpress.xml” and move it onto your desktop. Leave the “.xml” off if you’re on a Mac that has file extensions hidden.
Now go to your Launchpad and type “Terminal.” Open the terminal app.
Type “cd desktop” and press enter. This navigates to your desktop.
Now type or paste in this command: npx wordpress-export-to-markdown
It will ask if it can install the package (If not, you may need to install npx first). Type “y” for yes and press enter.
If the package installs successfully, it should say “Starting wizard…” and ask the path to the Wordpress export file. Since we named our file, moved it to the desktop, and navigated there already, you should just be able to type “wordpress.xml” and press enter.
Press enter when it asks the output folder and it will create a default. There are a couple more options that are up to you. When it asks whether to save images attached to posts, say no because it will take a long time and you don’t need ‘em.
After the last question, it will start saving posts:
Now you should have a .md (markdown) file for each of your blog posts in a folder called “output” on your desktop.
2. Set up an Entry Point project
Entry Point AI is our software platform that makes the rest of the data preparation and fine-tuning process a breeze.
You won’t need to write a single line of code and you can close that command line window.
Plus, since our community plan allows up to 300 examples, it’s free!
After you sign up for a free Entry Point account, you first need to connect your OpenAI account under the Integrations tab on the top nav bar.
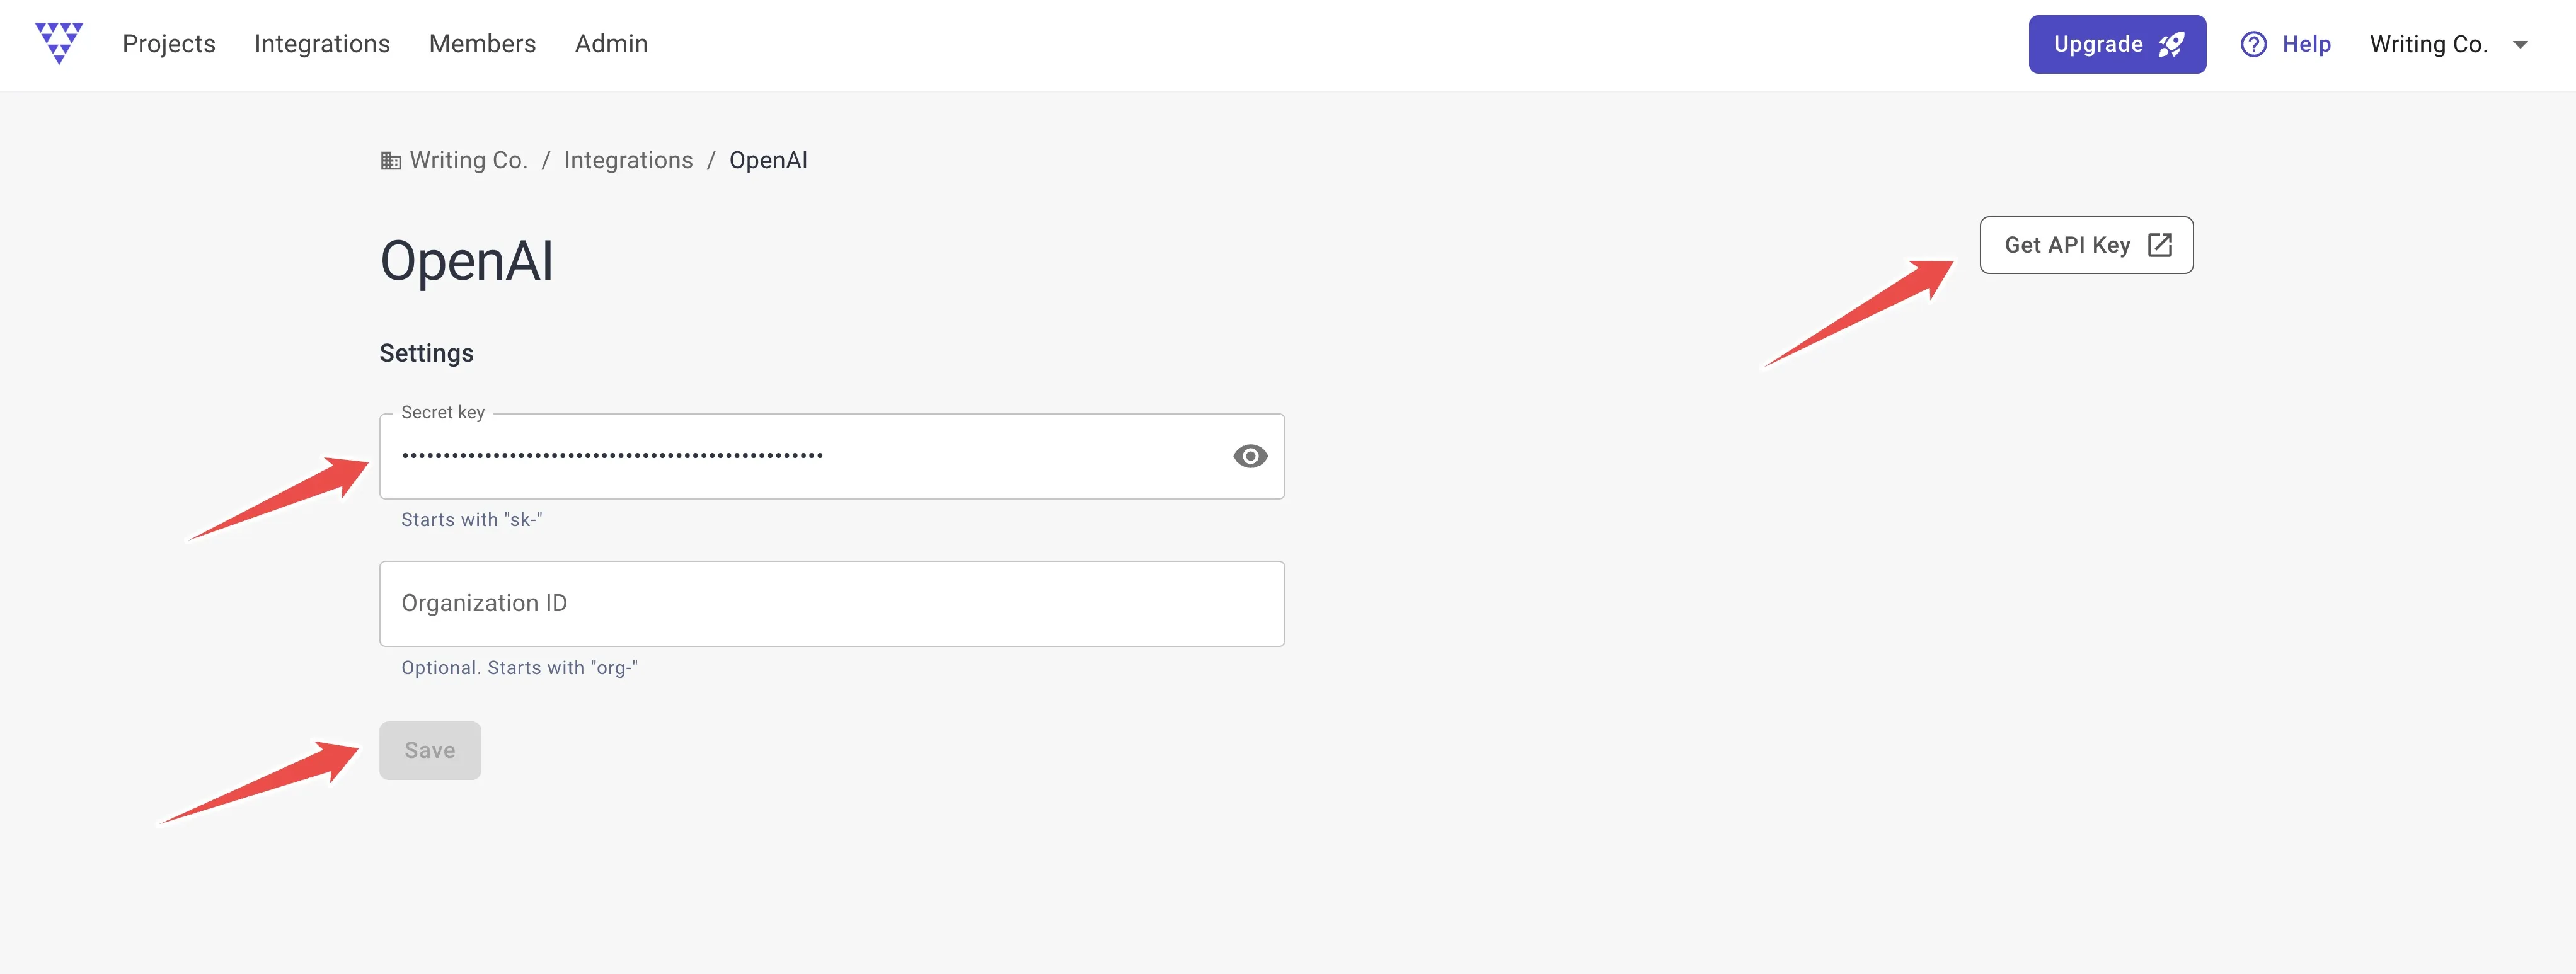
Here we provide a button for “Get API Key” that takes you to OpenAI for you to create a new key. Make sure to copy it and paste the new key into the Integration settings, then press Save. You don’t typically need to enter anything in the Organization ID field.
Also, add some money to your OpenAI account if you haven’t yet. $5-10 should be plenty. The only costs will be token usage and fine-tuning charges from OpenAI, which we’ll estimate for you.
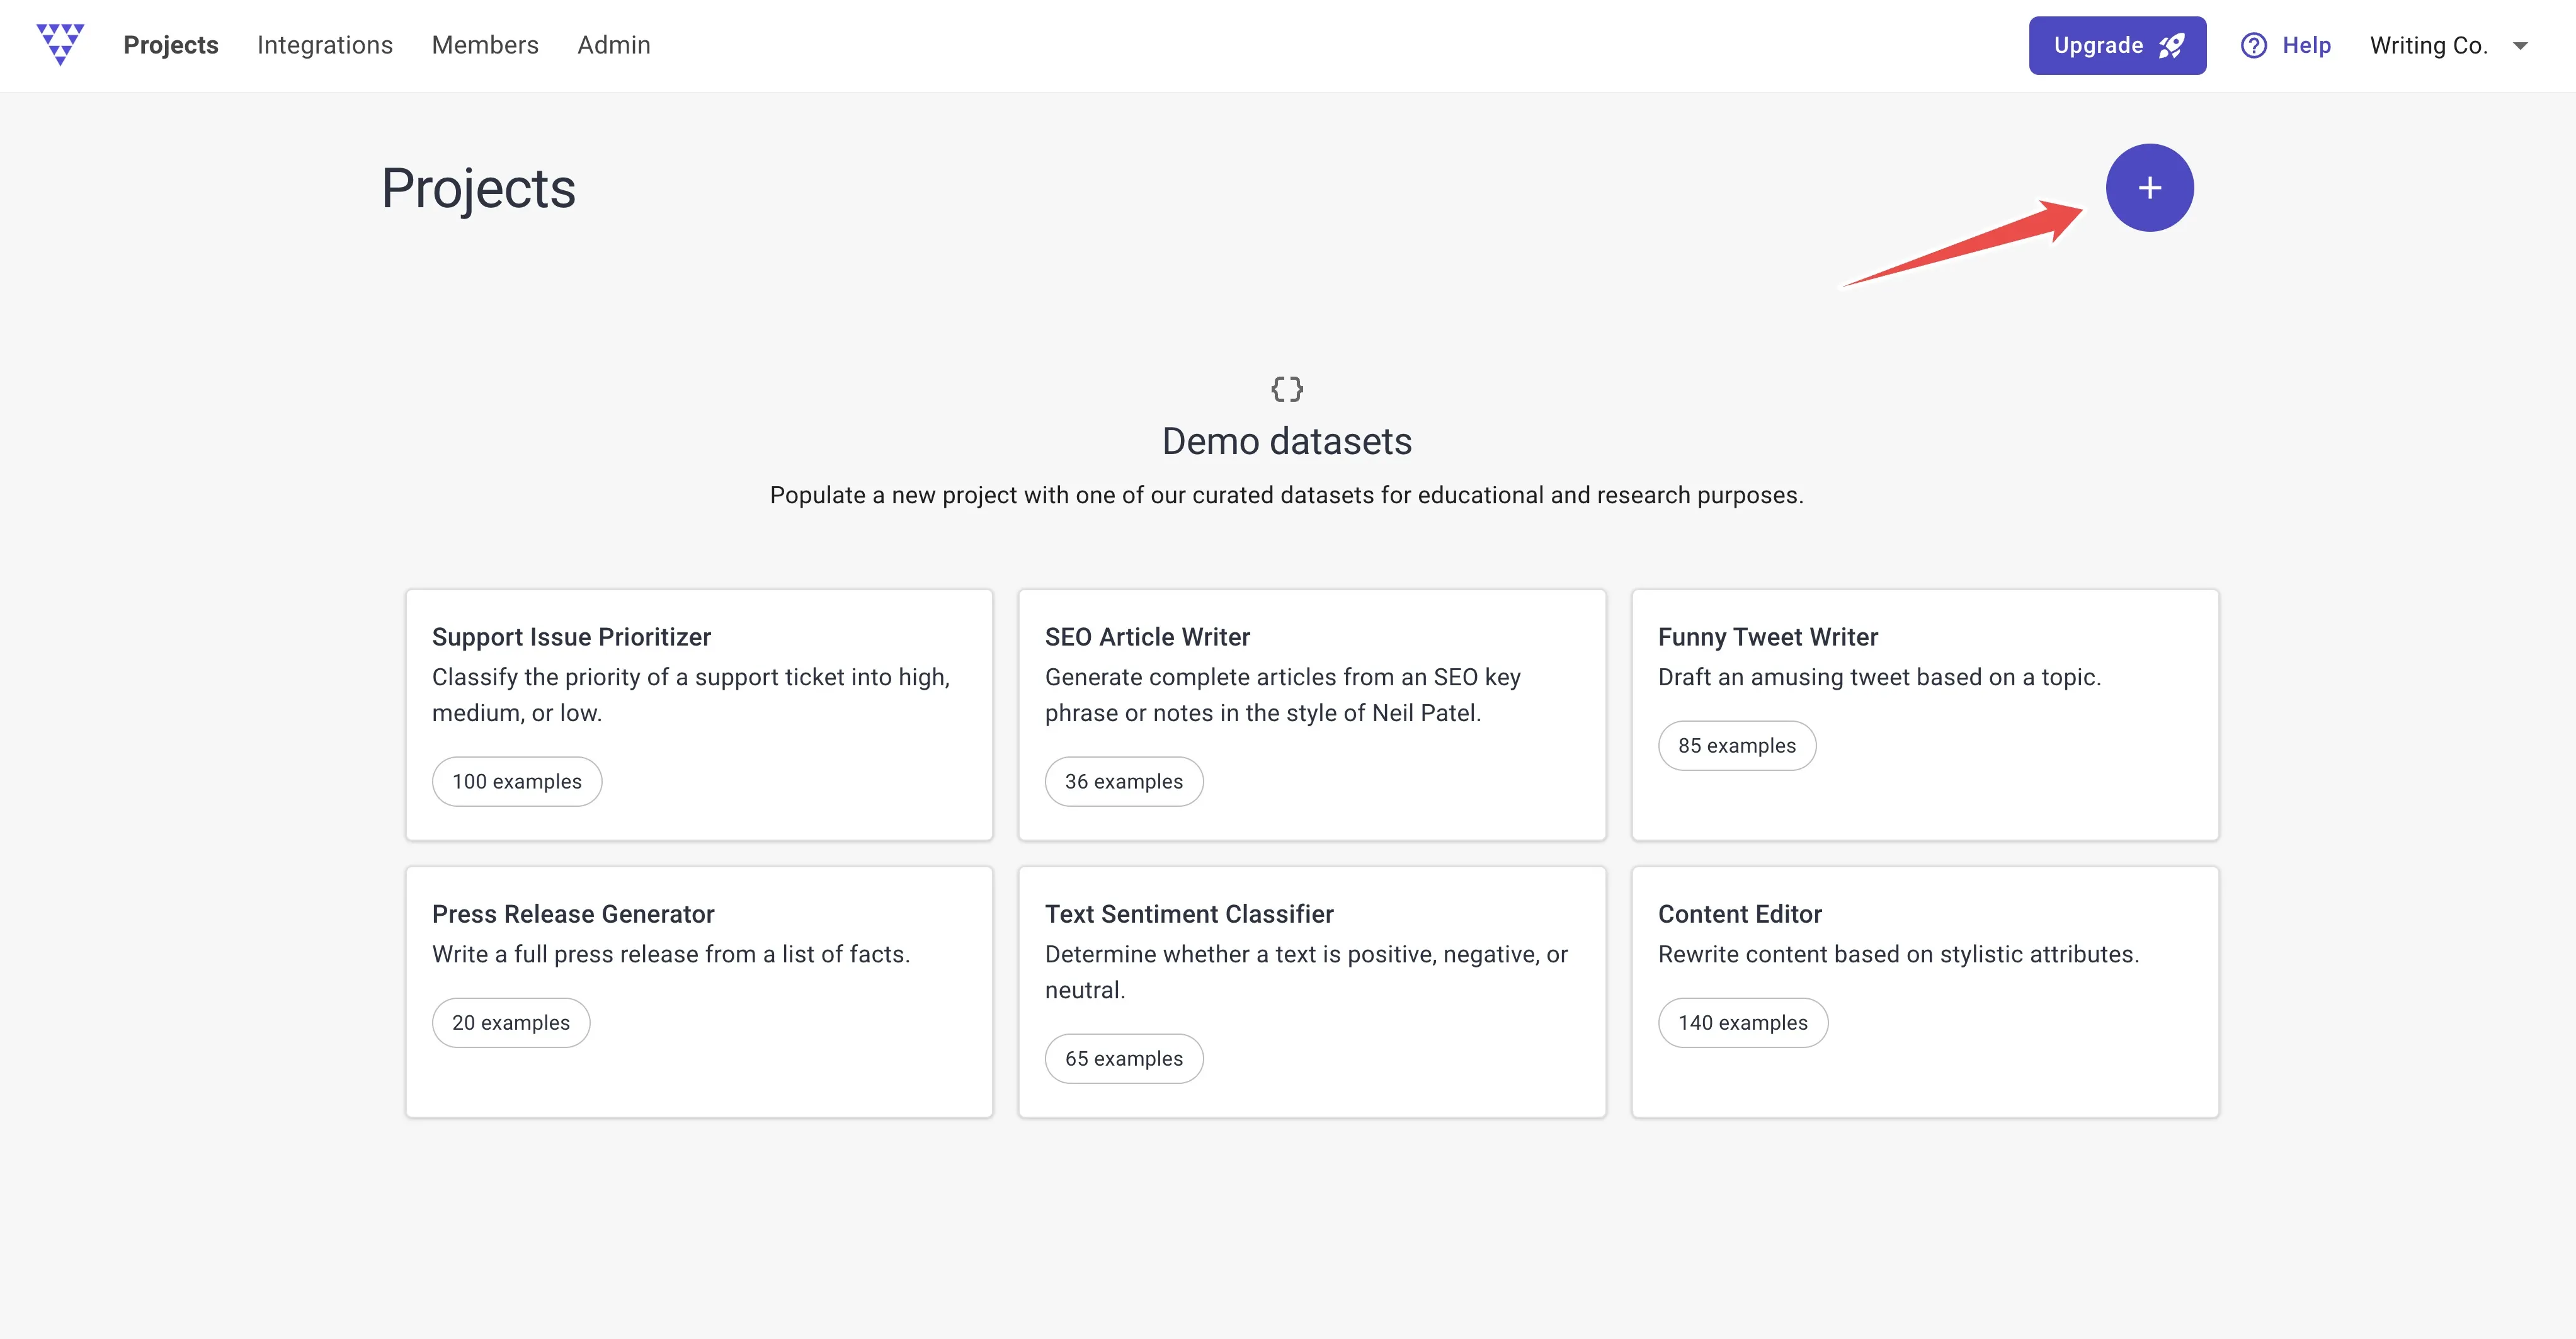
After you get your OpenAI API key and save it in Entry Point, go back to the Projects tab, and press the plus button to create a new project.
You’ll be asked to write a quick description of your project, which can be as simple as “Generate blog posts in my style and tone.”
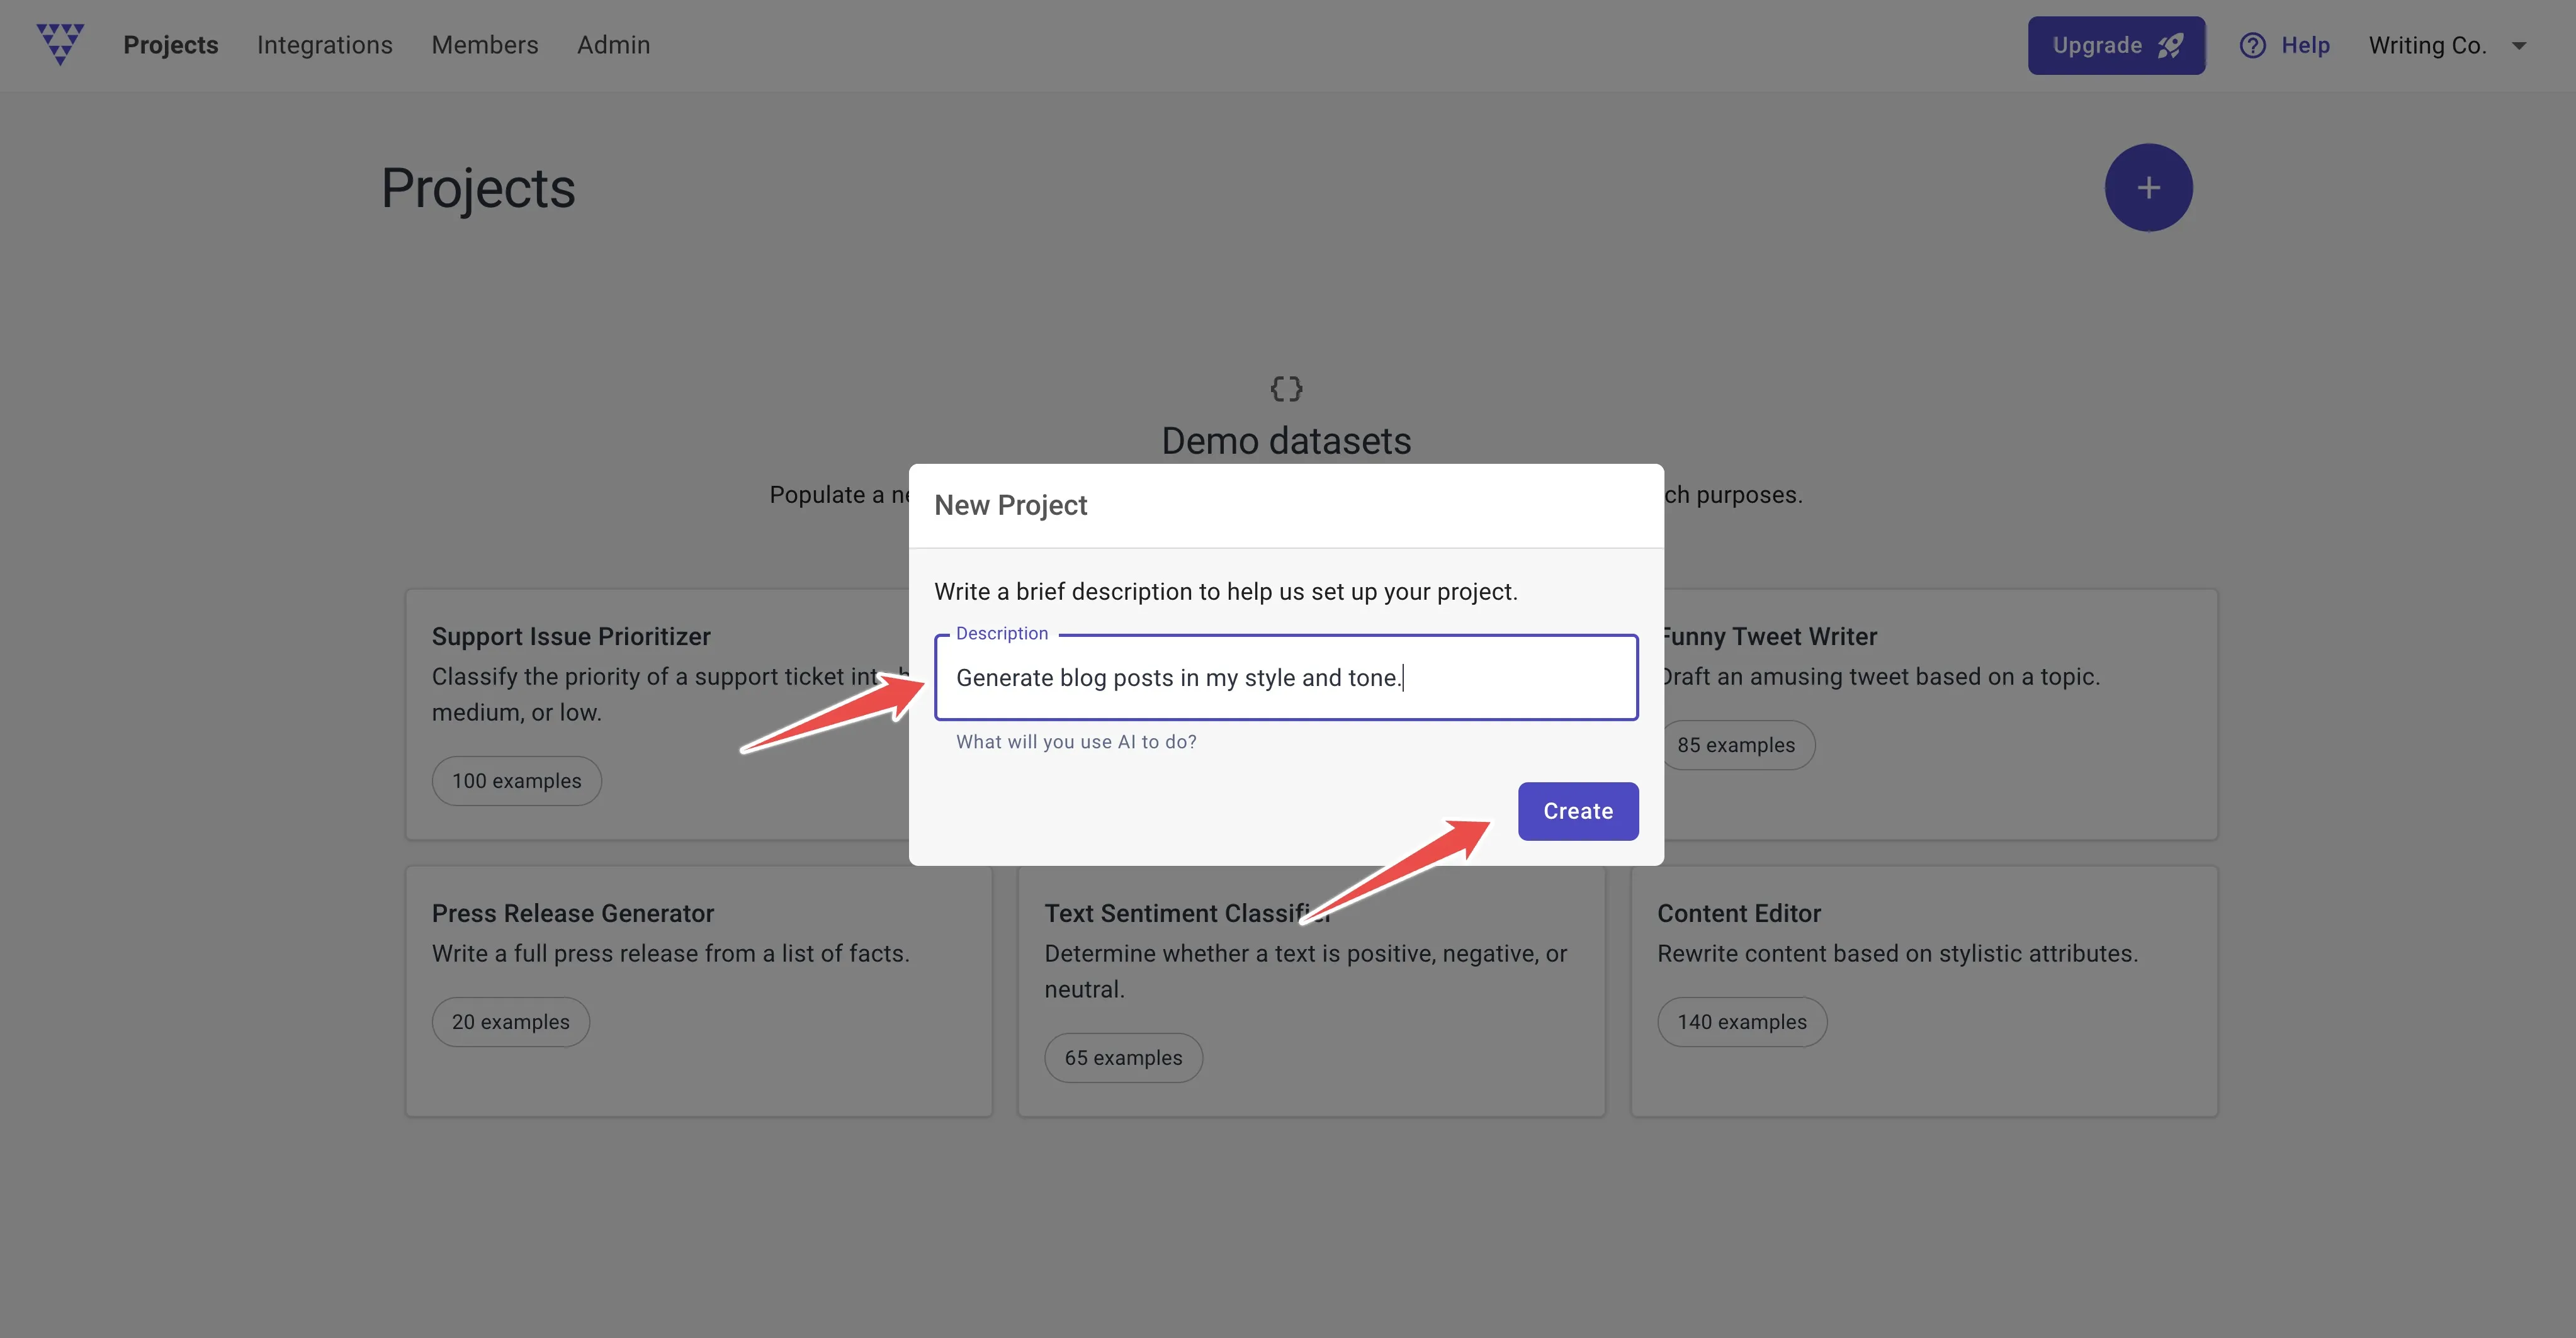
Based on your description, Entry Point will auto-magically name your project something like “Blog Post Generator.”
Next, we need to tell Entry Point what data we’re working with. Click on the Fields tab in the sidebar and press the + button.
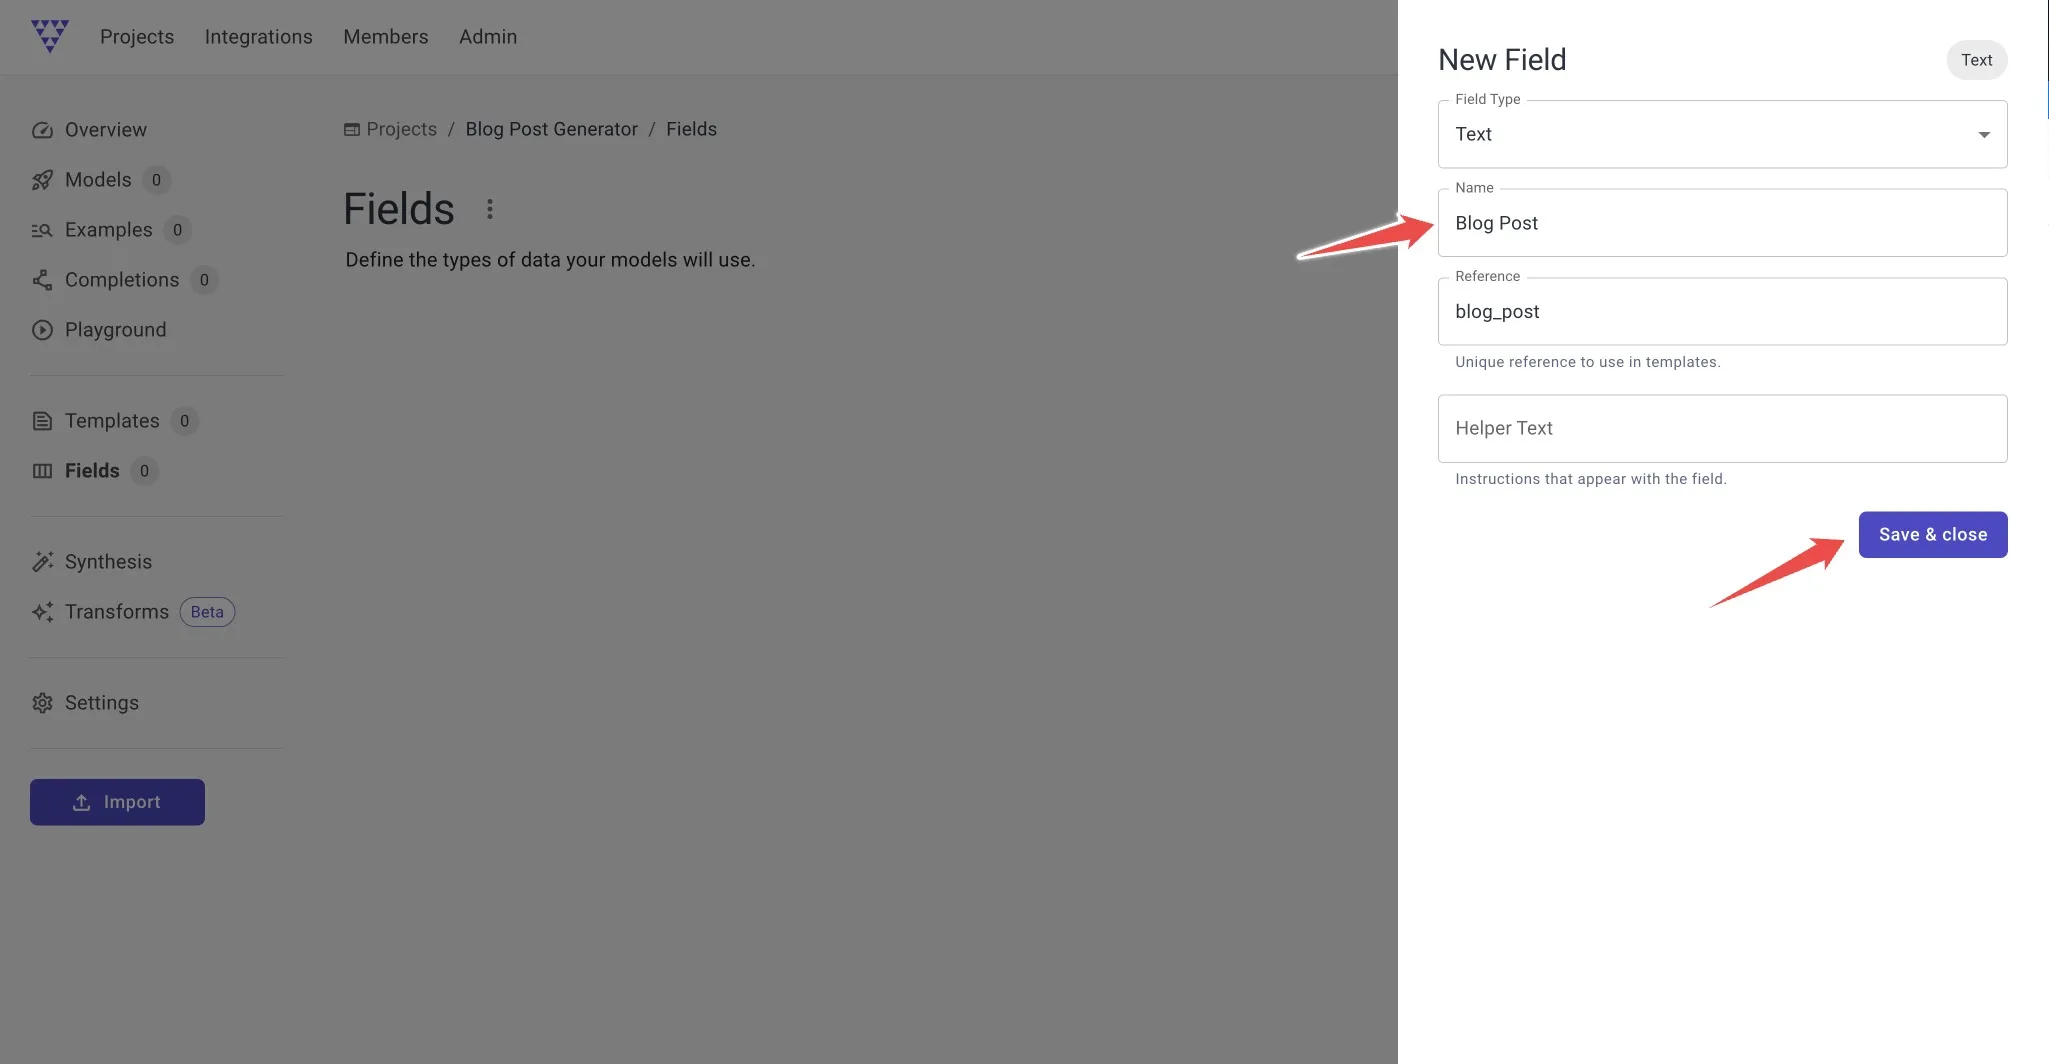
Type “Blog Post” into the Name input. The Reference box should say “blog_post”. Save and close.
Now we can start bringing in our best blog post examples.
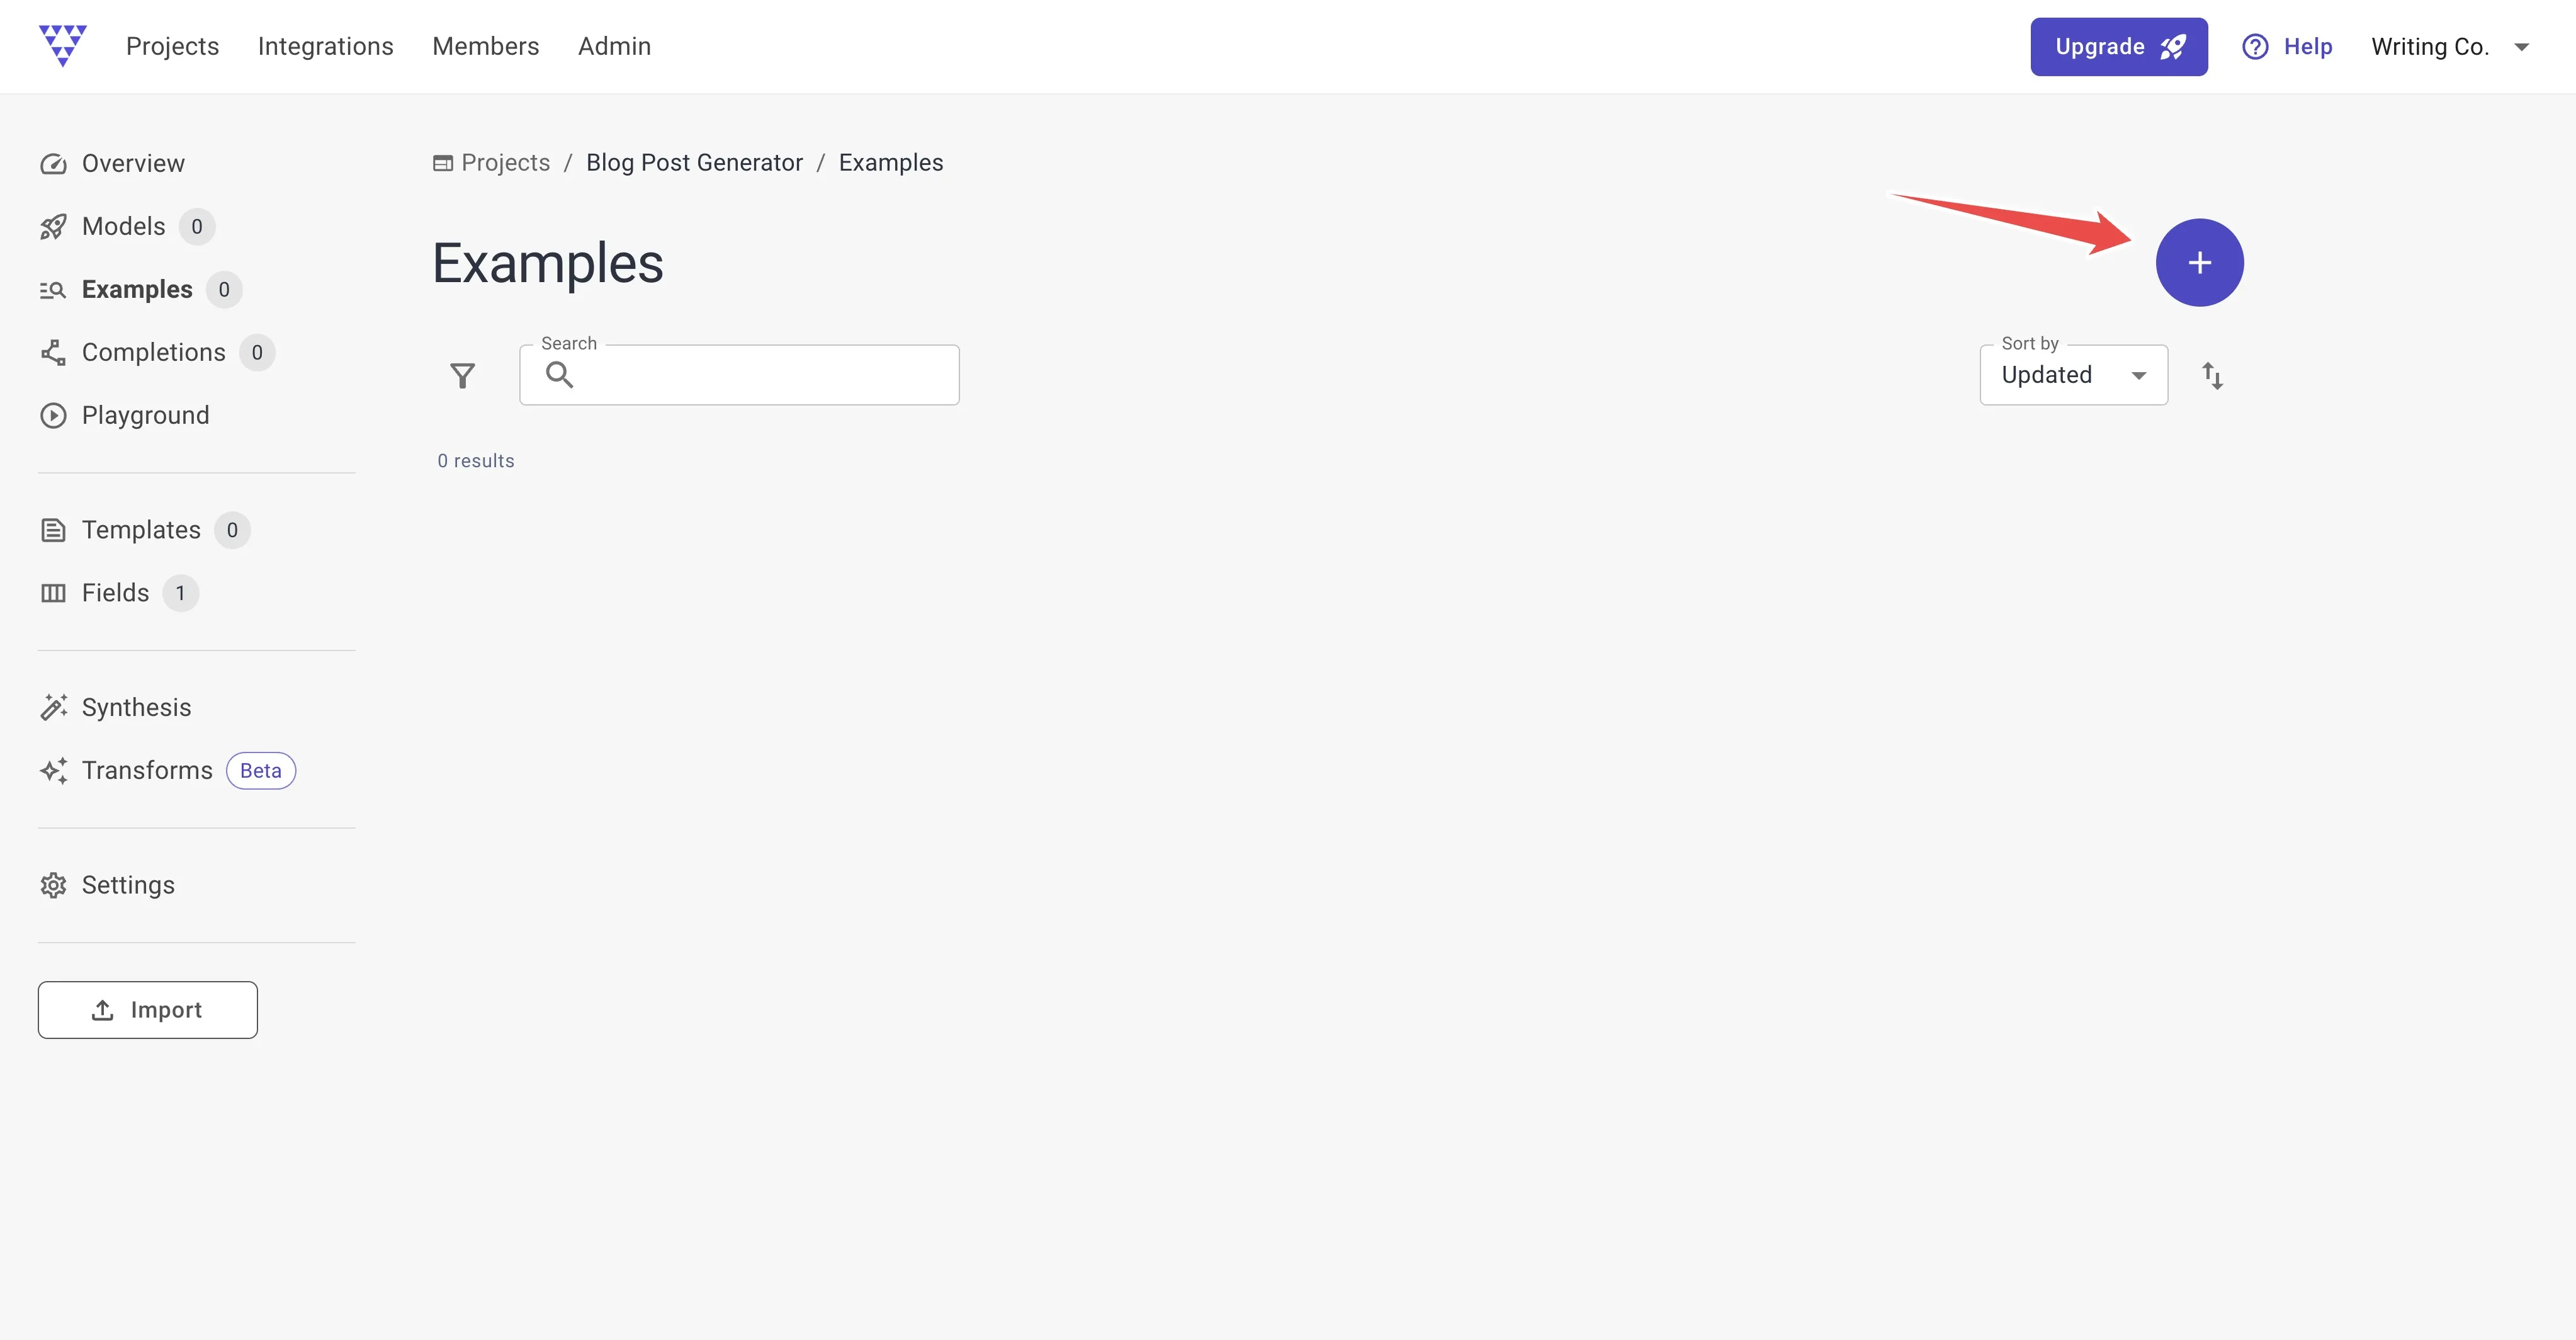
3. Import posts for your training data
Head to the Examples tab next, and press that big + button again.
Under the heading that says “Field Values” you should see the name of your new Blog Post field and a text box. This is where you will paste the markdown for each article.
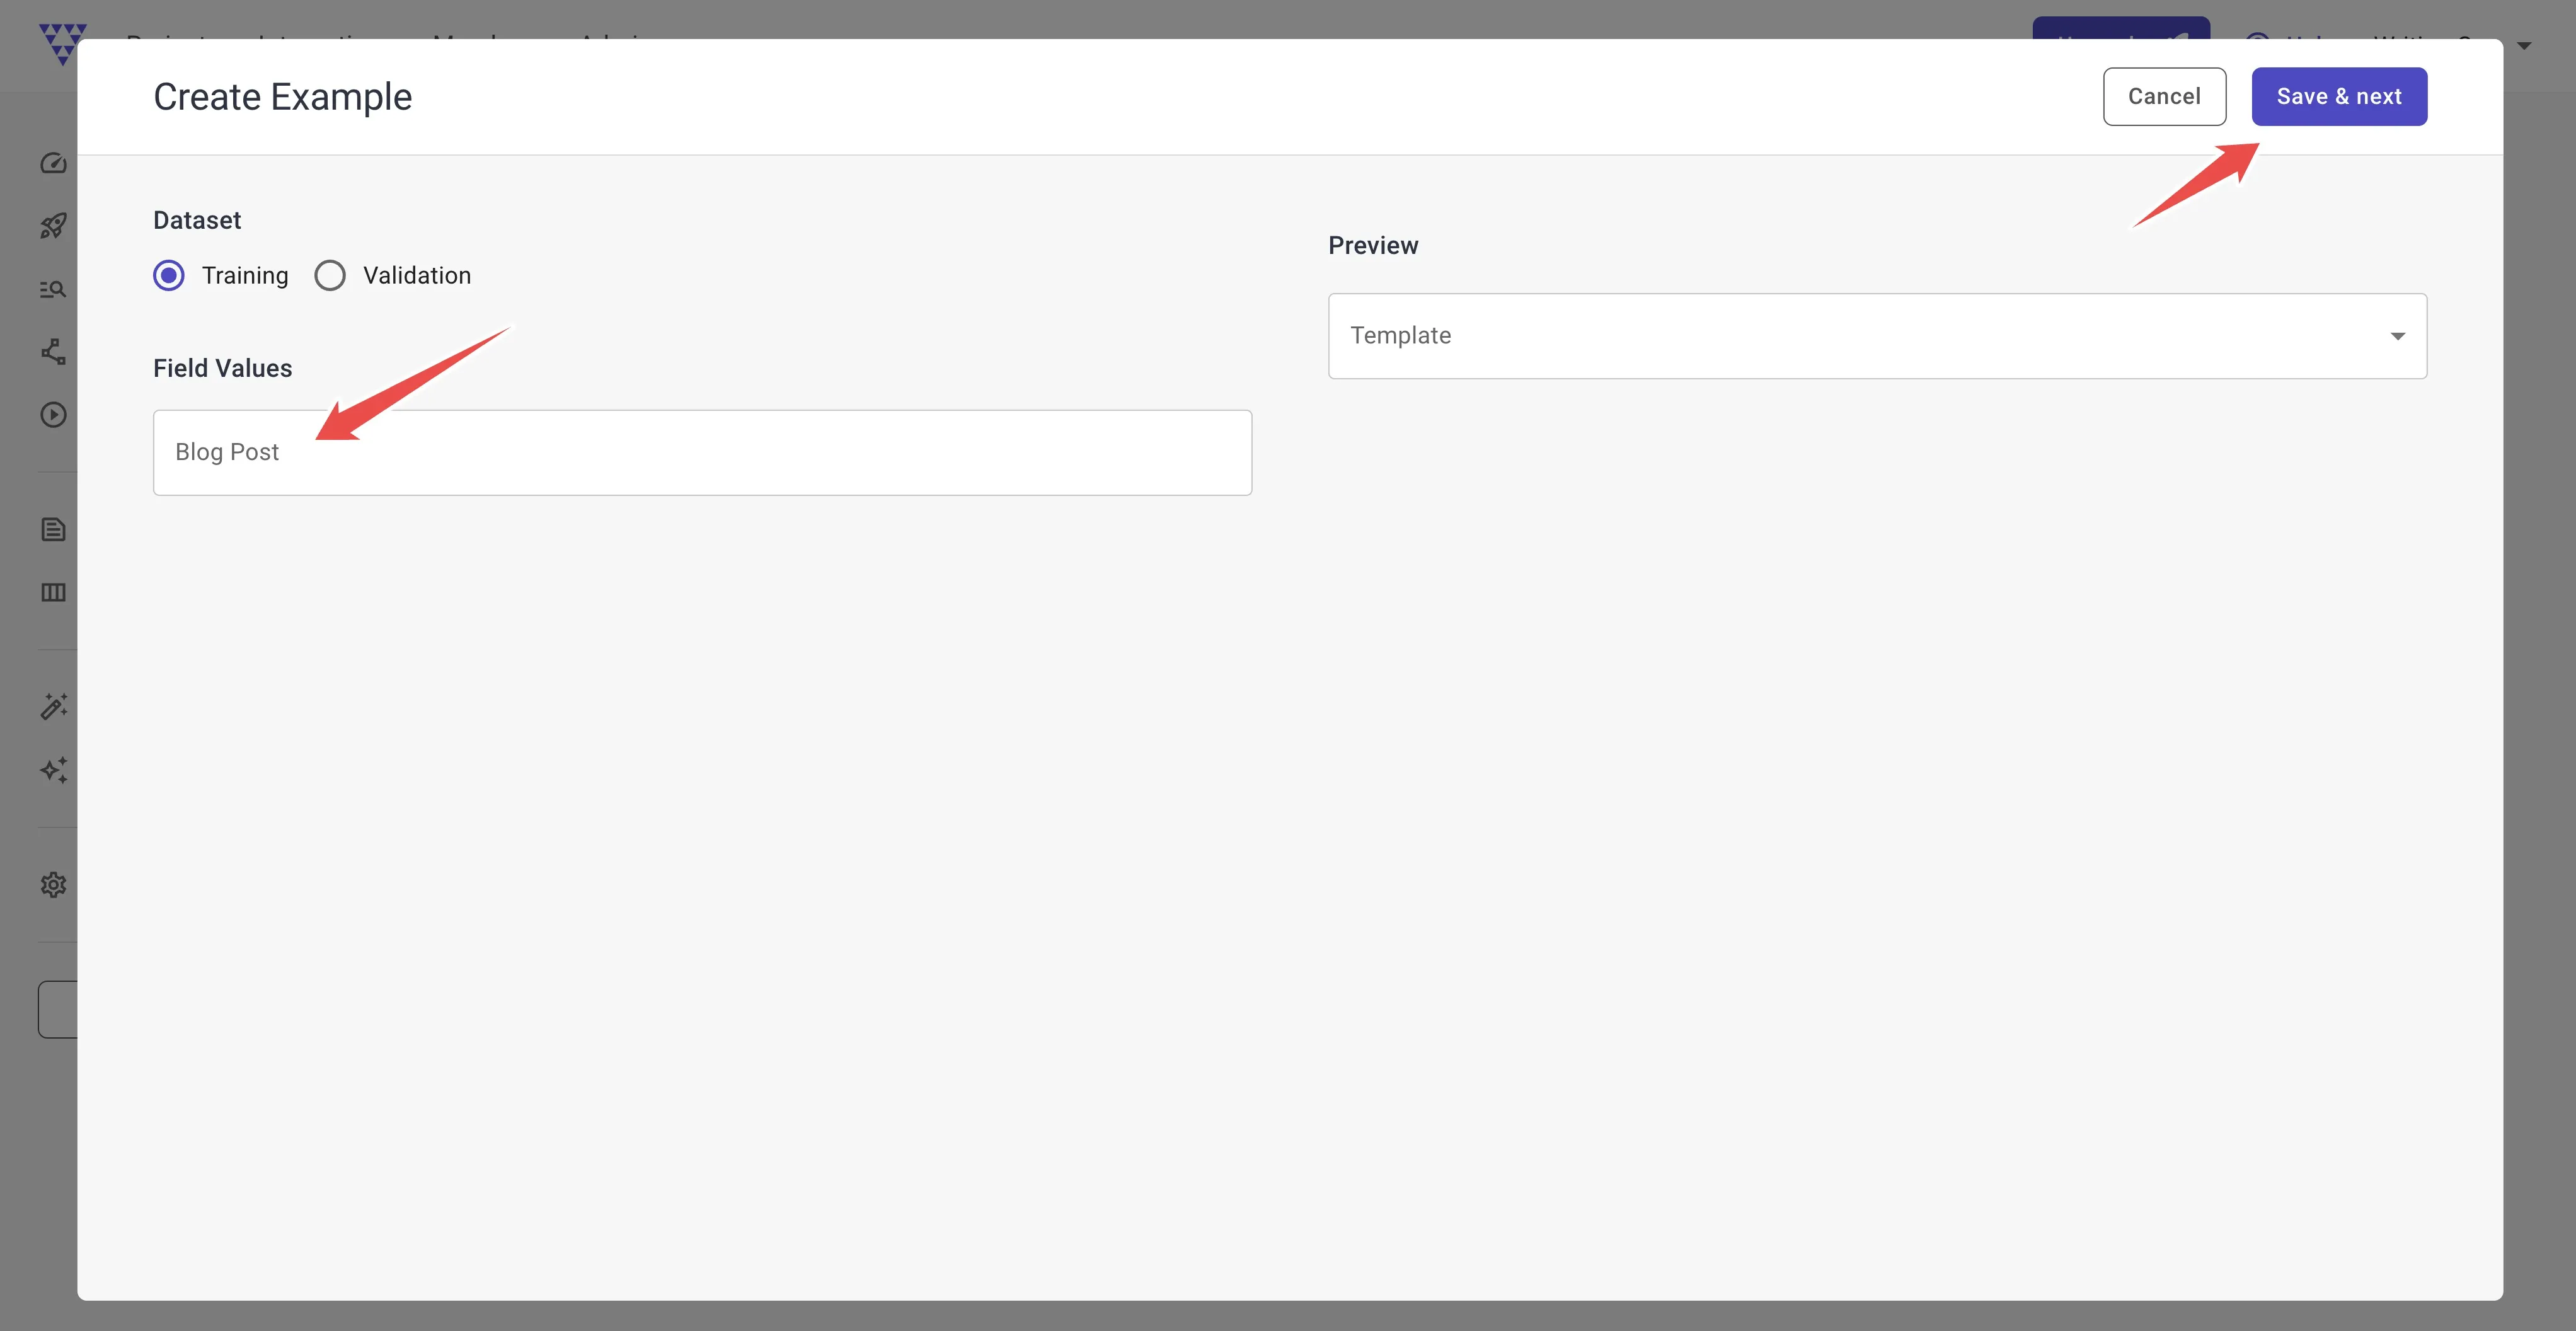
Paste it in, press save & next, and repeat, until you have at least 20 articles. 40 is even better, but you can start with less.
This will be worth the effort of importing them, because even if it takes the time that one post would take for you to write manually, soon you’ll have the power to generate unlimited articles at your fingertips.
Note: Entry Point does support importing a CSV file with bulk examples if you’re able to get your blog posts into this format to save time.
The key here is that we want to feed our model the best posts, the ones most representative of the content we want to create in the future. So as you’re going through these, just skip any that you feel shouldn’t make the cut.
Also, keep in mind that extremely long examples won’t work.
They should be under approximately 3,000 words to work with GPT-3.5 Turbo, the model we will use for fine-tuning.
Even models that claim very large context windows can often only output content this long — it’s the prompts that can be longer.
4. Reverse-engineer your blog posts into prompts
Now, you have a bunch of examples of blog posts in Entry Point.
But what will our model learn to write these posts from? Building a fine-tuning dataset is kind of like designing a user interface. You get to choose what your inputs are that lead to your outputs.
We want our model to be steerable, which means that we should give it some examples of prompts that would have lead to these high-quality articles. The problem is that we don’t have these.
That’s where another Entry Point tool comes in, called Transforms. Transforms allow us to transform our data from one thing into another, using simple prompts.
So we’re going to use an LLM to generate some rough notes that could conceivably prompted the articles to be generated. The idea is that when you use your custom model in practice, you can just scribble down some rough notes and it will use them to guide it’s generation.
The longer the notes are, the more closely they will dictate the full blog post, and the more our AI model will expect you to hold its hand through the content.
The shorter the notes are, the more is left to interpretation and creativity, the more our model will expect that it is supposed to go off and create the ideas for content itself. These are two characteristics we need to try to balance.
Fine-tuning models is half art and half science.
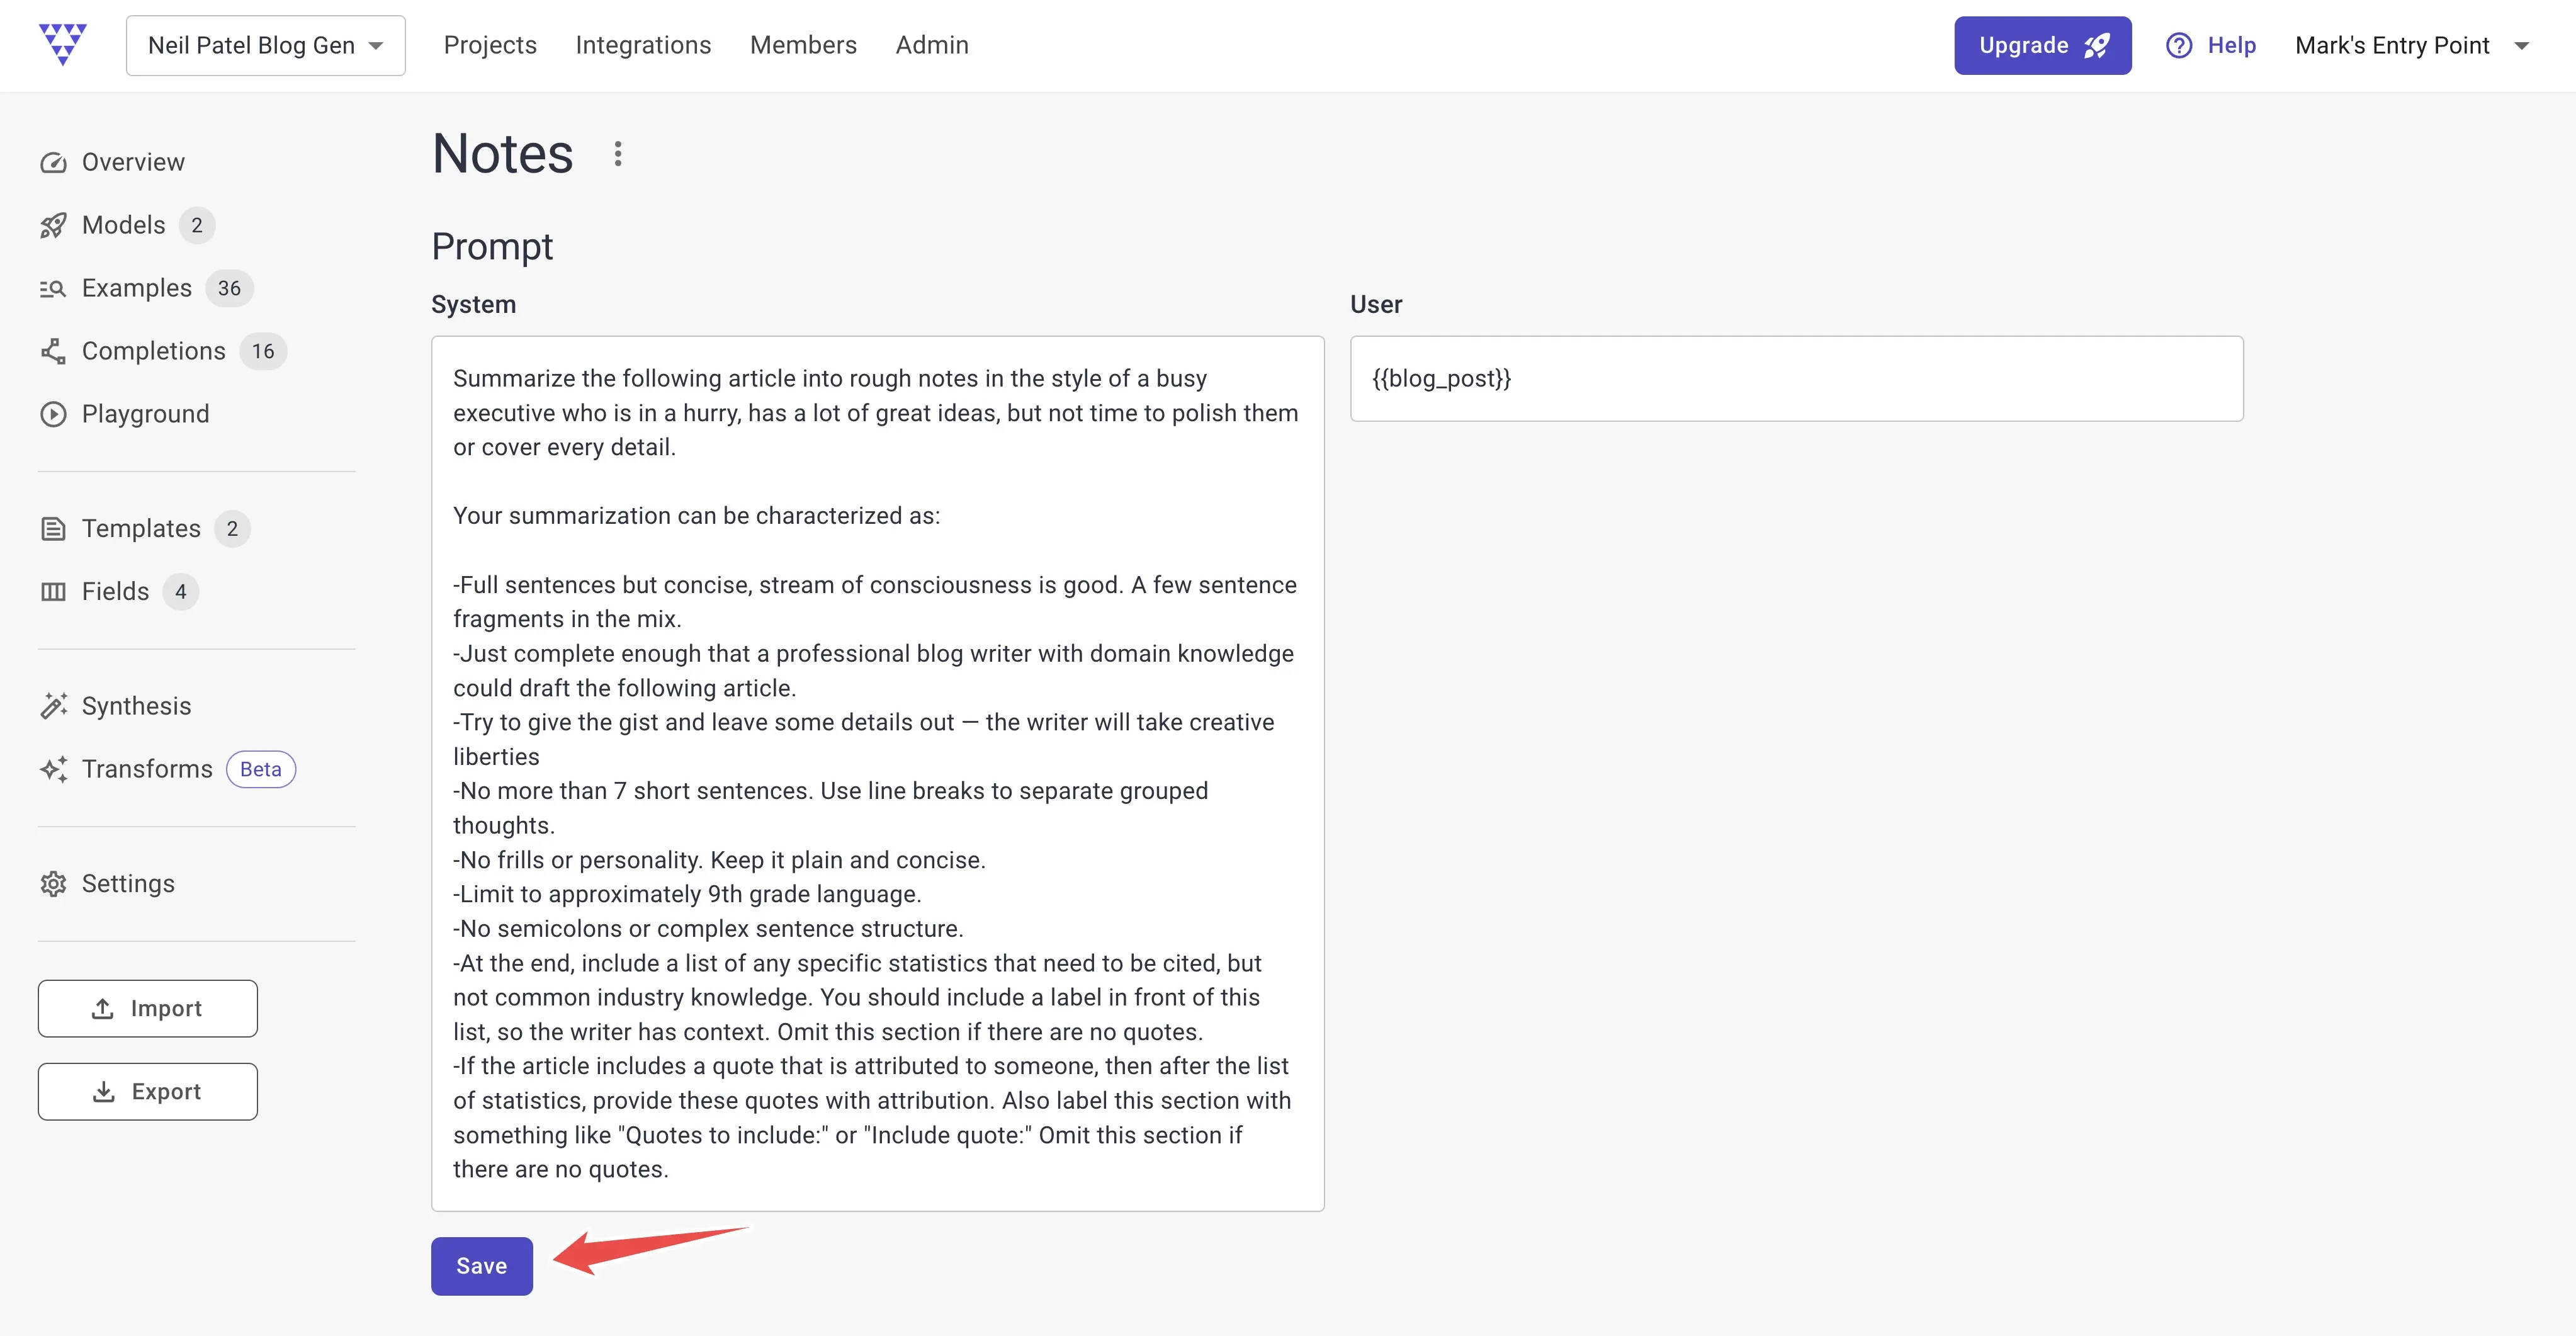
At any rate, here is a prompt that I wrote for this task:
Summarize the following article into rough notes in the style of a busy executive who is in a hurry, has a lot of great ideas, but not time to polish them or cover every detail.
Your summarization can be characterized as:
-Full sentences but concise, stream of consciousness is good. A few sentence fragments in the mix. -Just complete enough that a professional blog writer with domain knowledge could draft the following article. -Try to give the gist and leave some details out — the writer will take creative liberties -No more than 7 short sentences. Use line breaks to separate grouped thoughts. -No frills or personality. Keep it plain and concise. -Limit to approximately 9th grade language. -No semicolons or complex sentence structure. -At the end, include a list of any specific statistics that need to be cited, but not common industry knowledge. You should include a label in front of this list, so the writer has context. Omit this section if there are no quotes. -If the article includes a quote that is attributed to someone, then after the list of statistics, provide these quotes with attribution. Also label this section with something like “Quotes to include:” or “Include quote:” Omit this section if there are no quotes.
Now, go to the Transforms tab. Press the + button.
Paste the above prompt into the System text field. The User text field should have a reference to our blog post, which looks like {{blog_post}}. This allows us to use content from each example as a variable in our Transform prompt.
Press Save, and scroll down so we can test our prompt.
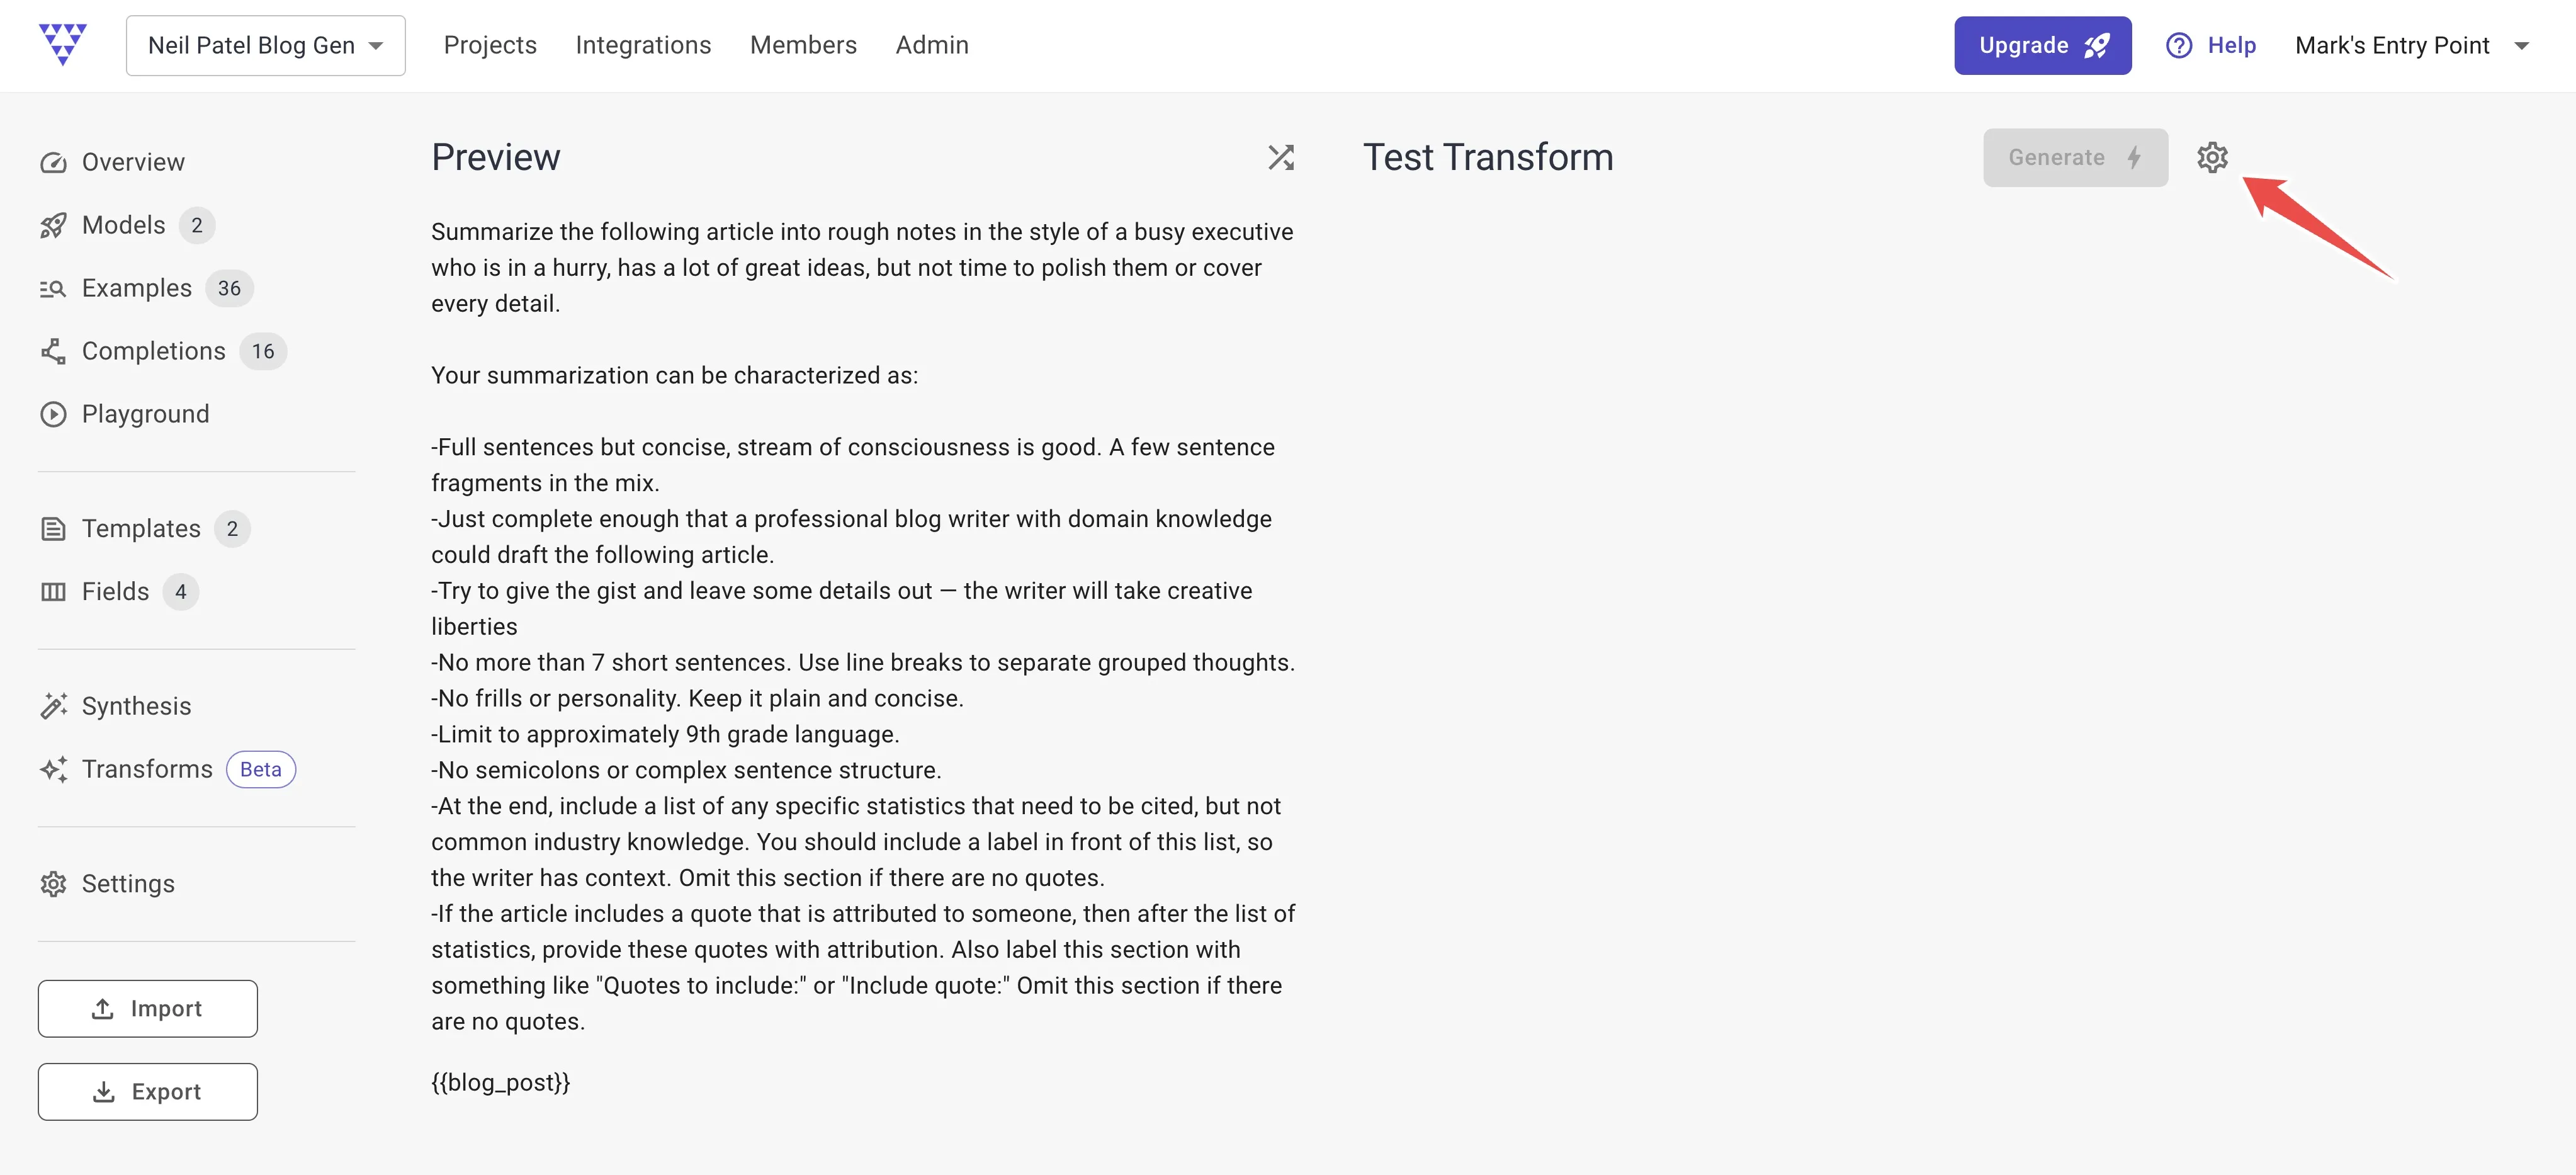
Where it says Test Transform, press the Settings icon.
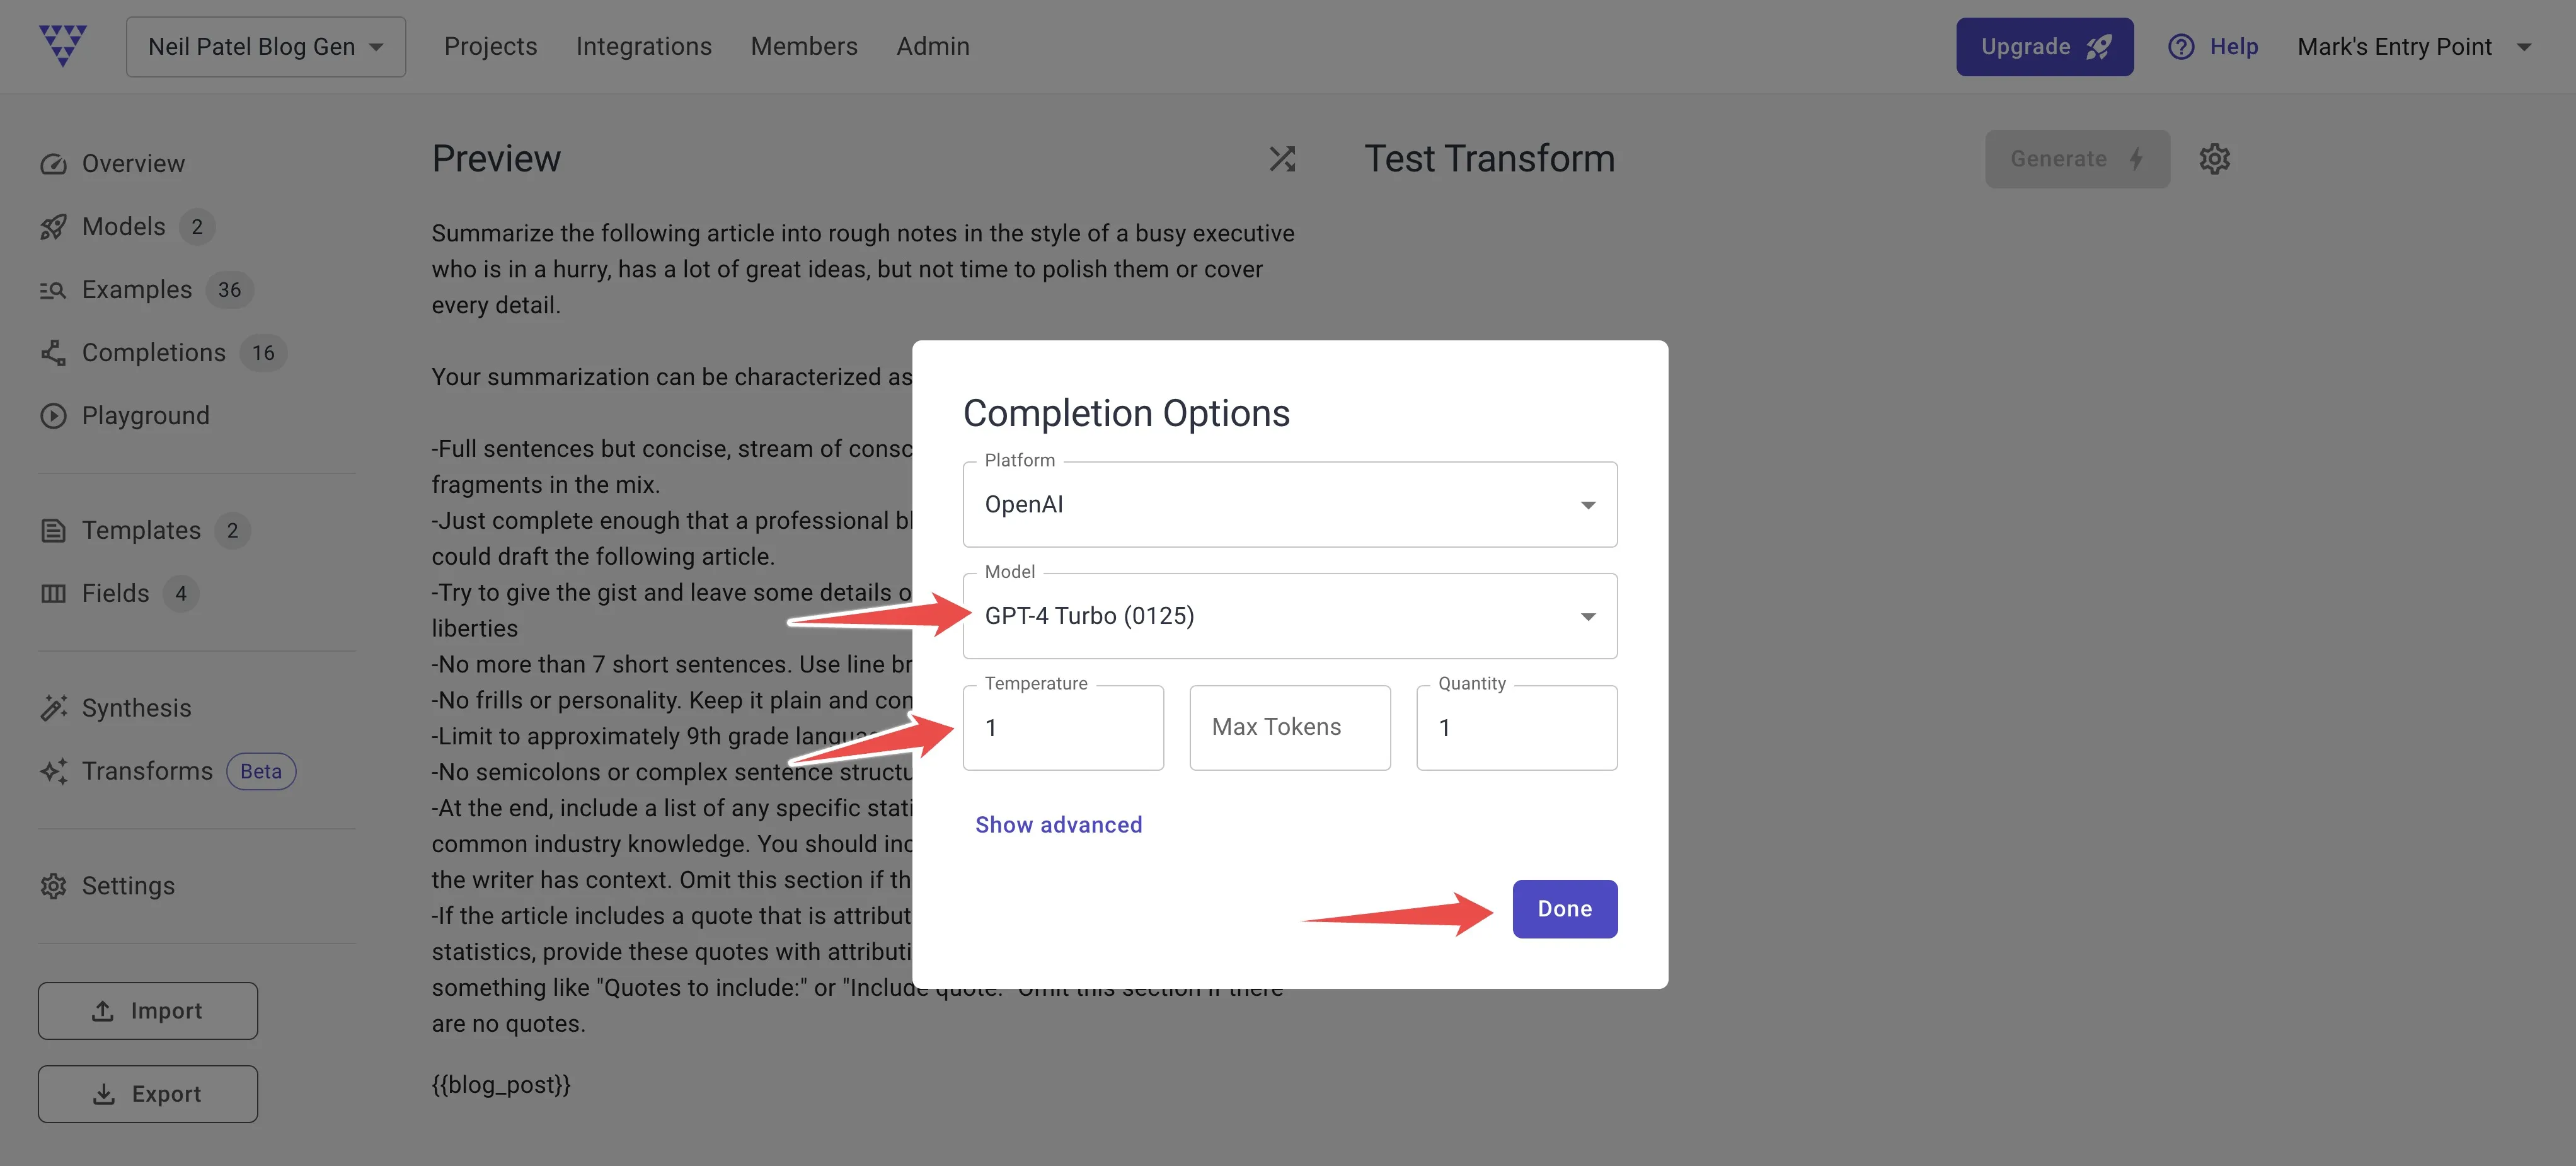
Choose GPT-4 Turbo and set the temperature to 1 — this adds more randomness, which is good for diversifying our inputs.
Press Done and then Generate.
See if the notes look like something you might write to guide a blog post. You can use the shuffle icon above the preview to switch to a different example and try it on a few.
Then scroll down to the Jobs section and press the + button.
A job allows us to apply our transform to all of our examples, and store the results in a new field.
You’ll see this screen:
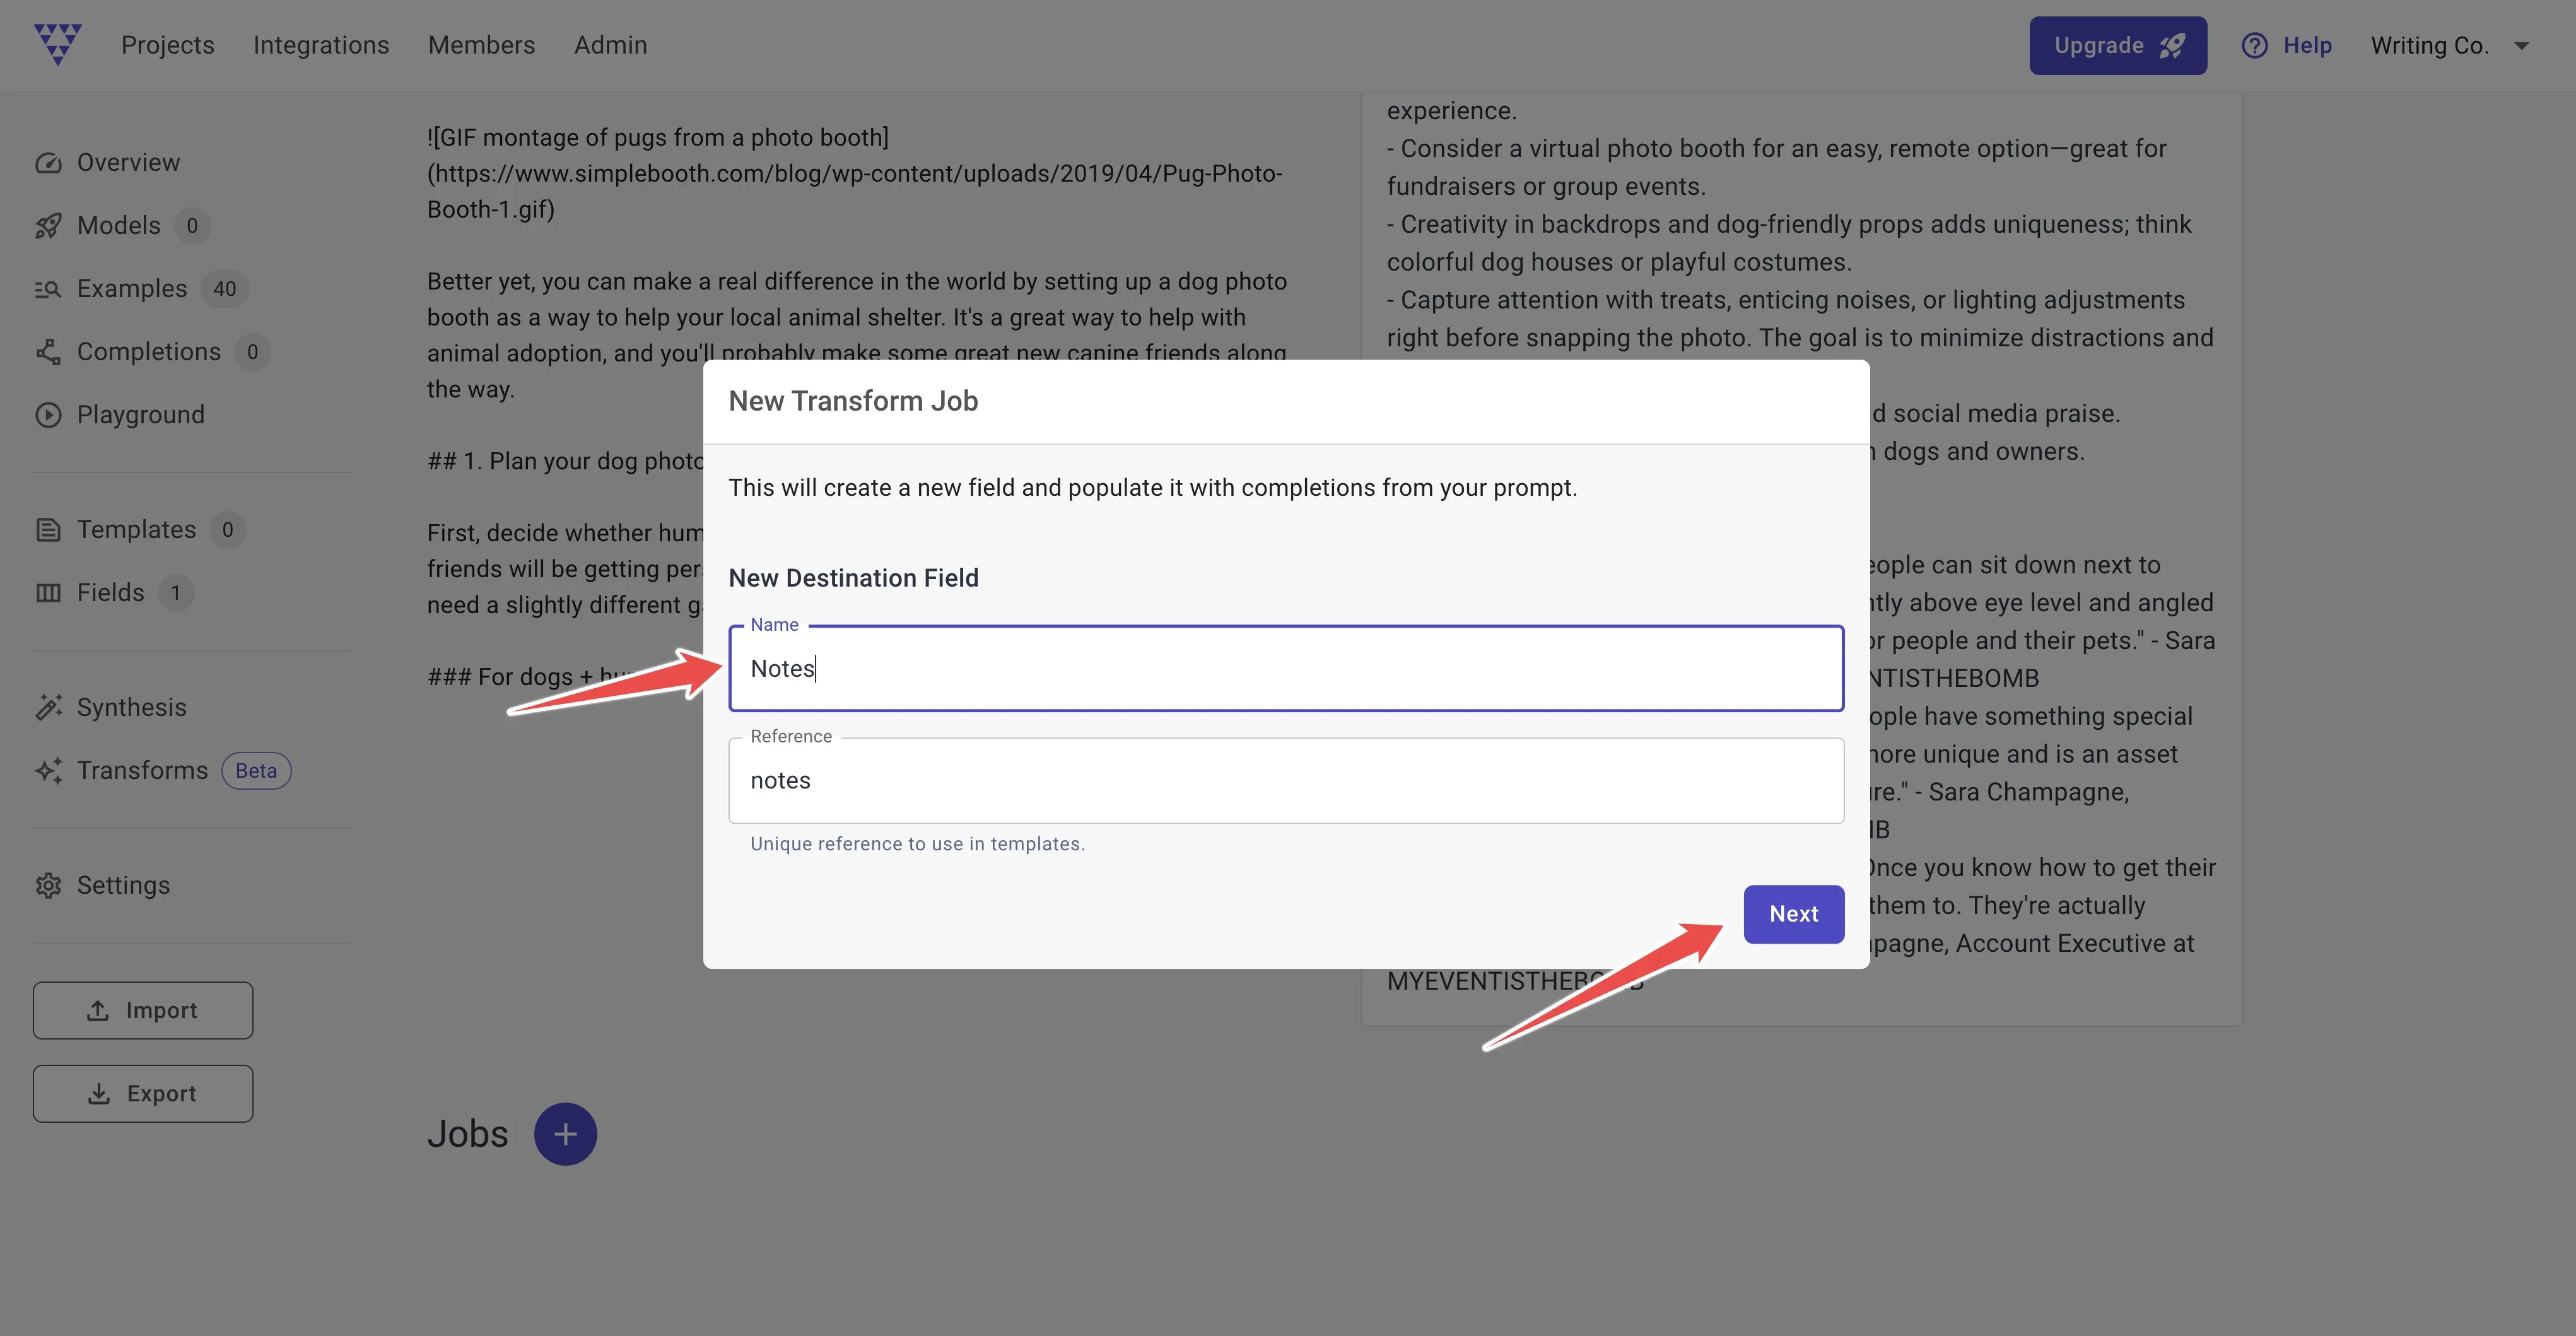
We will name our new destination field “Notes”.
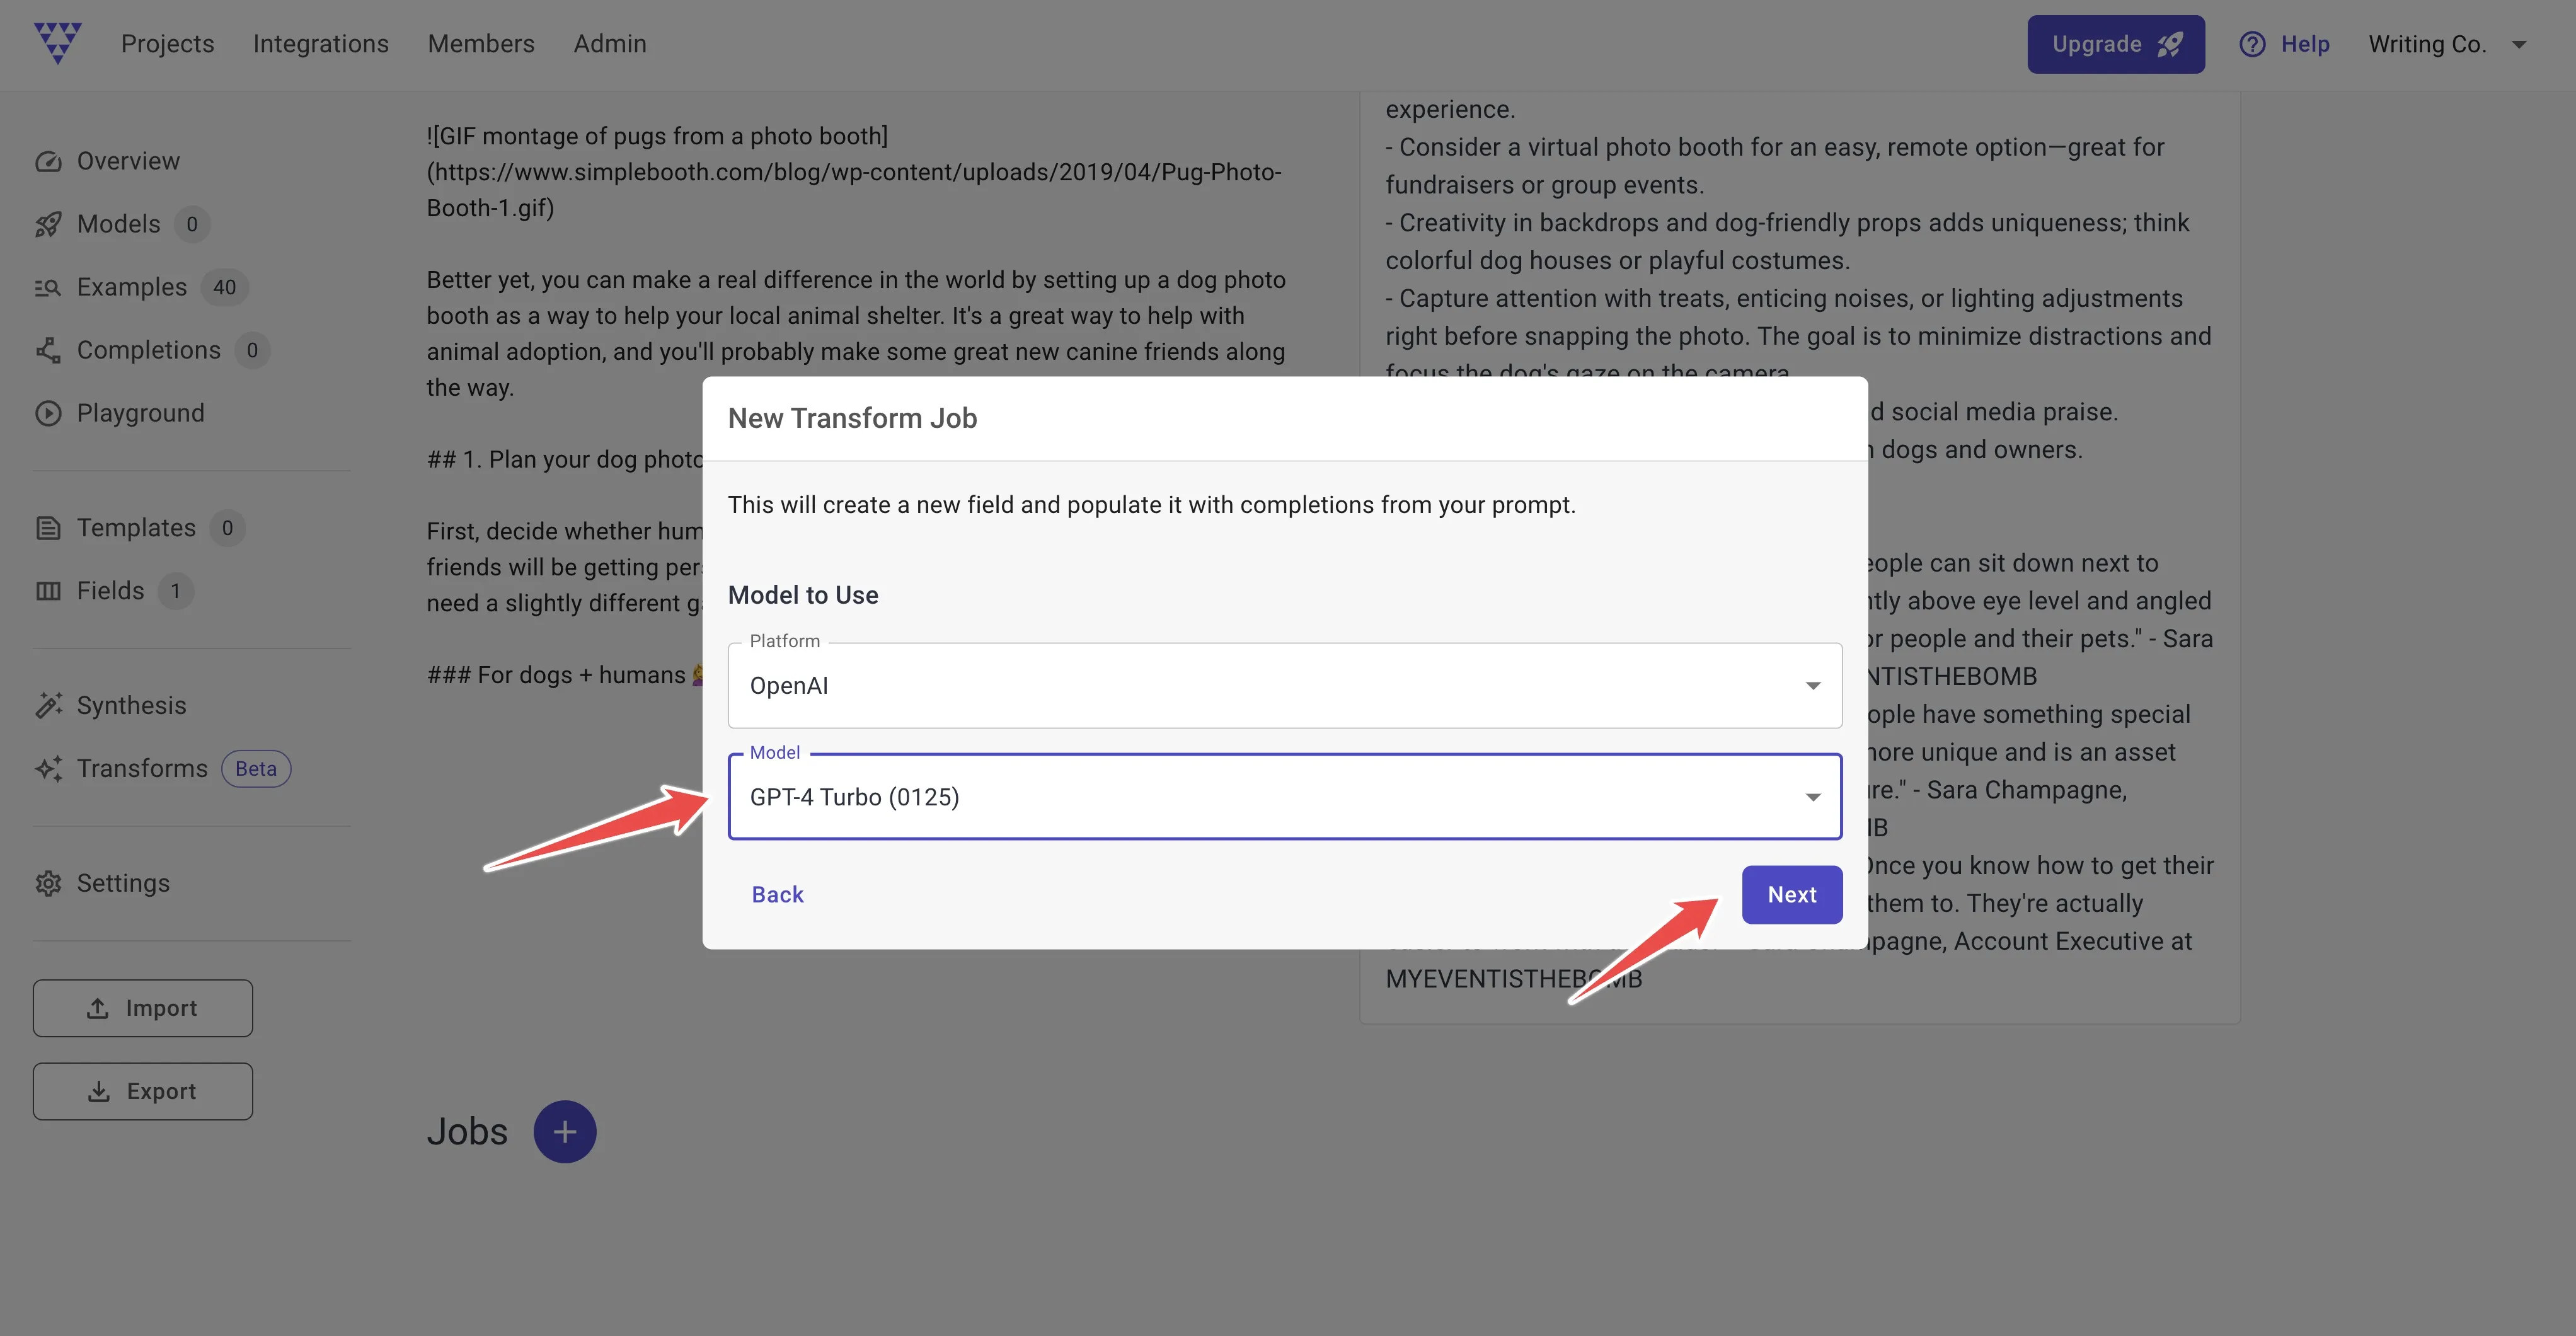
Press next and choose GPT-4 Turbo again:
Press next again. Here you can set the Temperature to 1 again, like we did when testing.
Initially the cost estimate might be overestimated, so you can limit it by setting max tokens to something like 1000. These costs are based on OpenAI’s pricing and charged by OpenAI for using their models.
If it looks good, press Start.
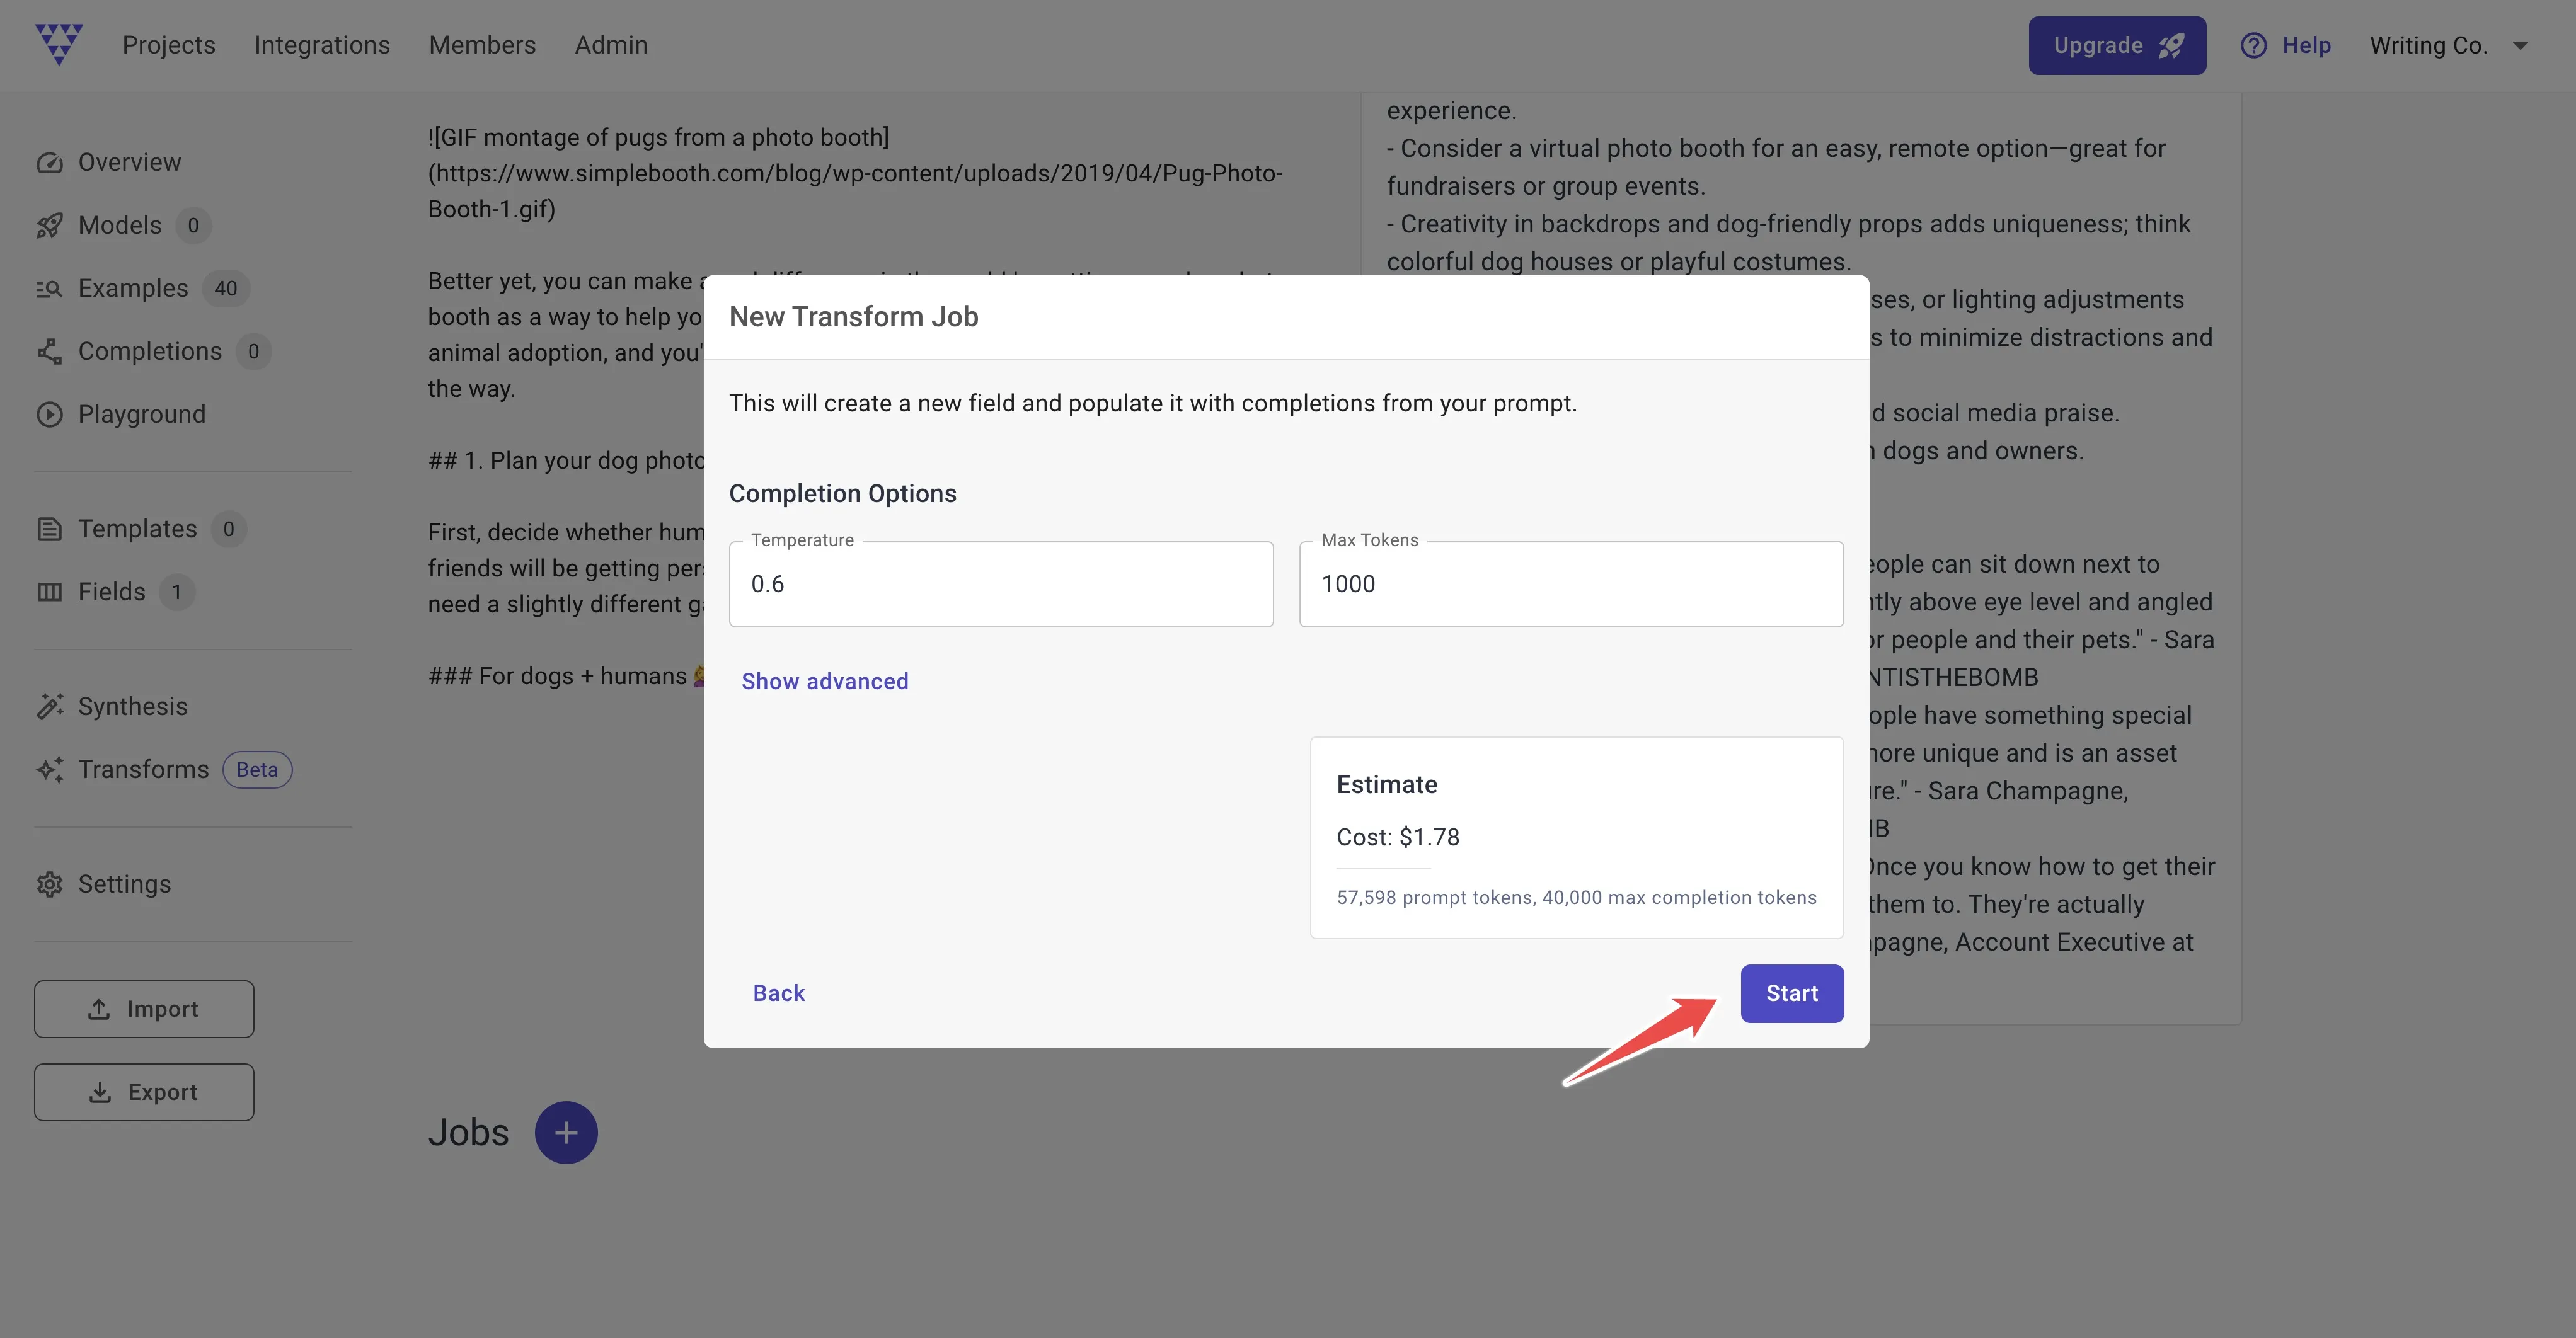
If you want to spend less, you can go back and choose GPT-3.5 Turbo instead, which is significantly cheaper.
Your job should only take a minute or two before it finishes.
4. Create a template
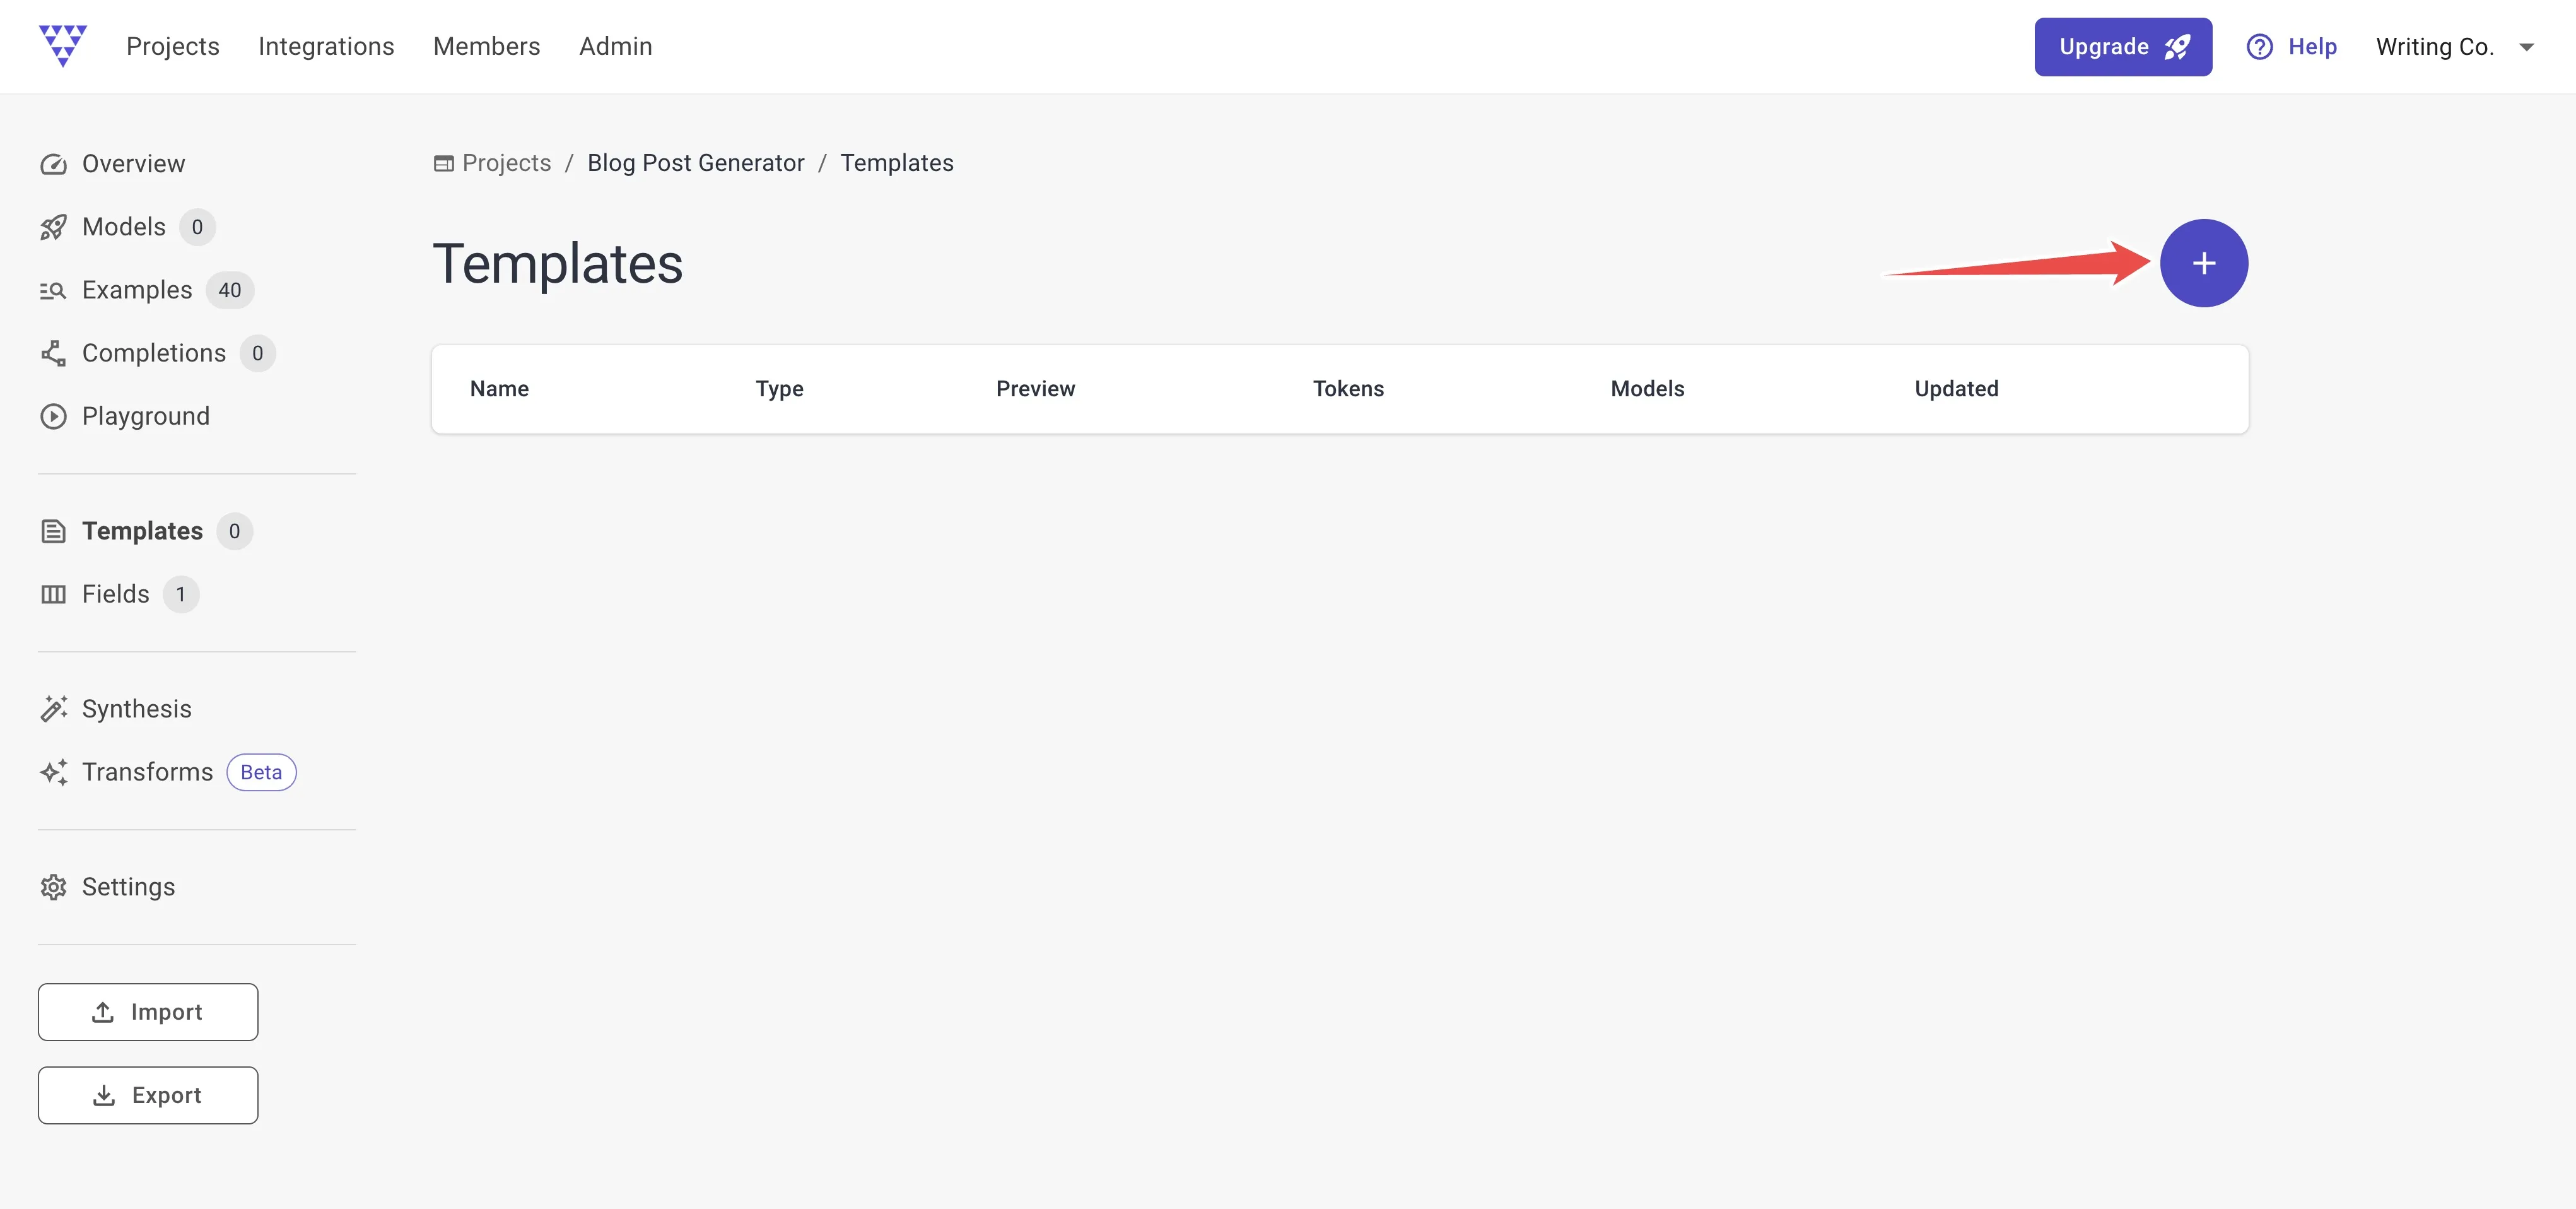
While your job is finishing you can go to the Templates tab and create a template.
Templates tell Entry Point how to format our training data for fine-tuning.
Press the + button.
This will be a Chat template, which should be the default.
Our System prompt will say “Write a blog post based on the notes.”
Our User prompt will just have our notes reference, “{{notes}}”.
The Completion or Assistant value will be the blog post, “{{blog_post}}”.
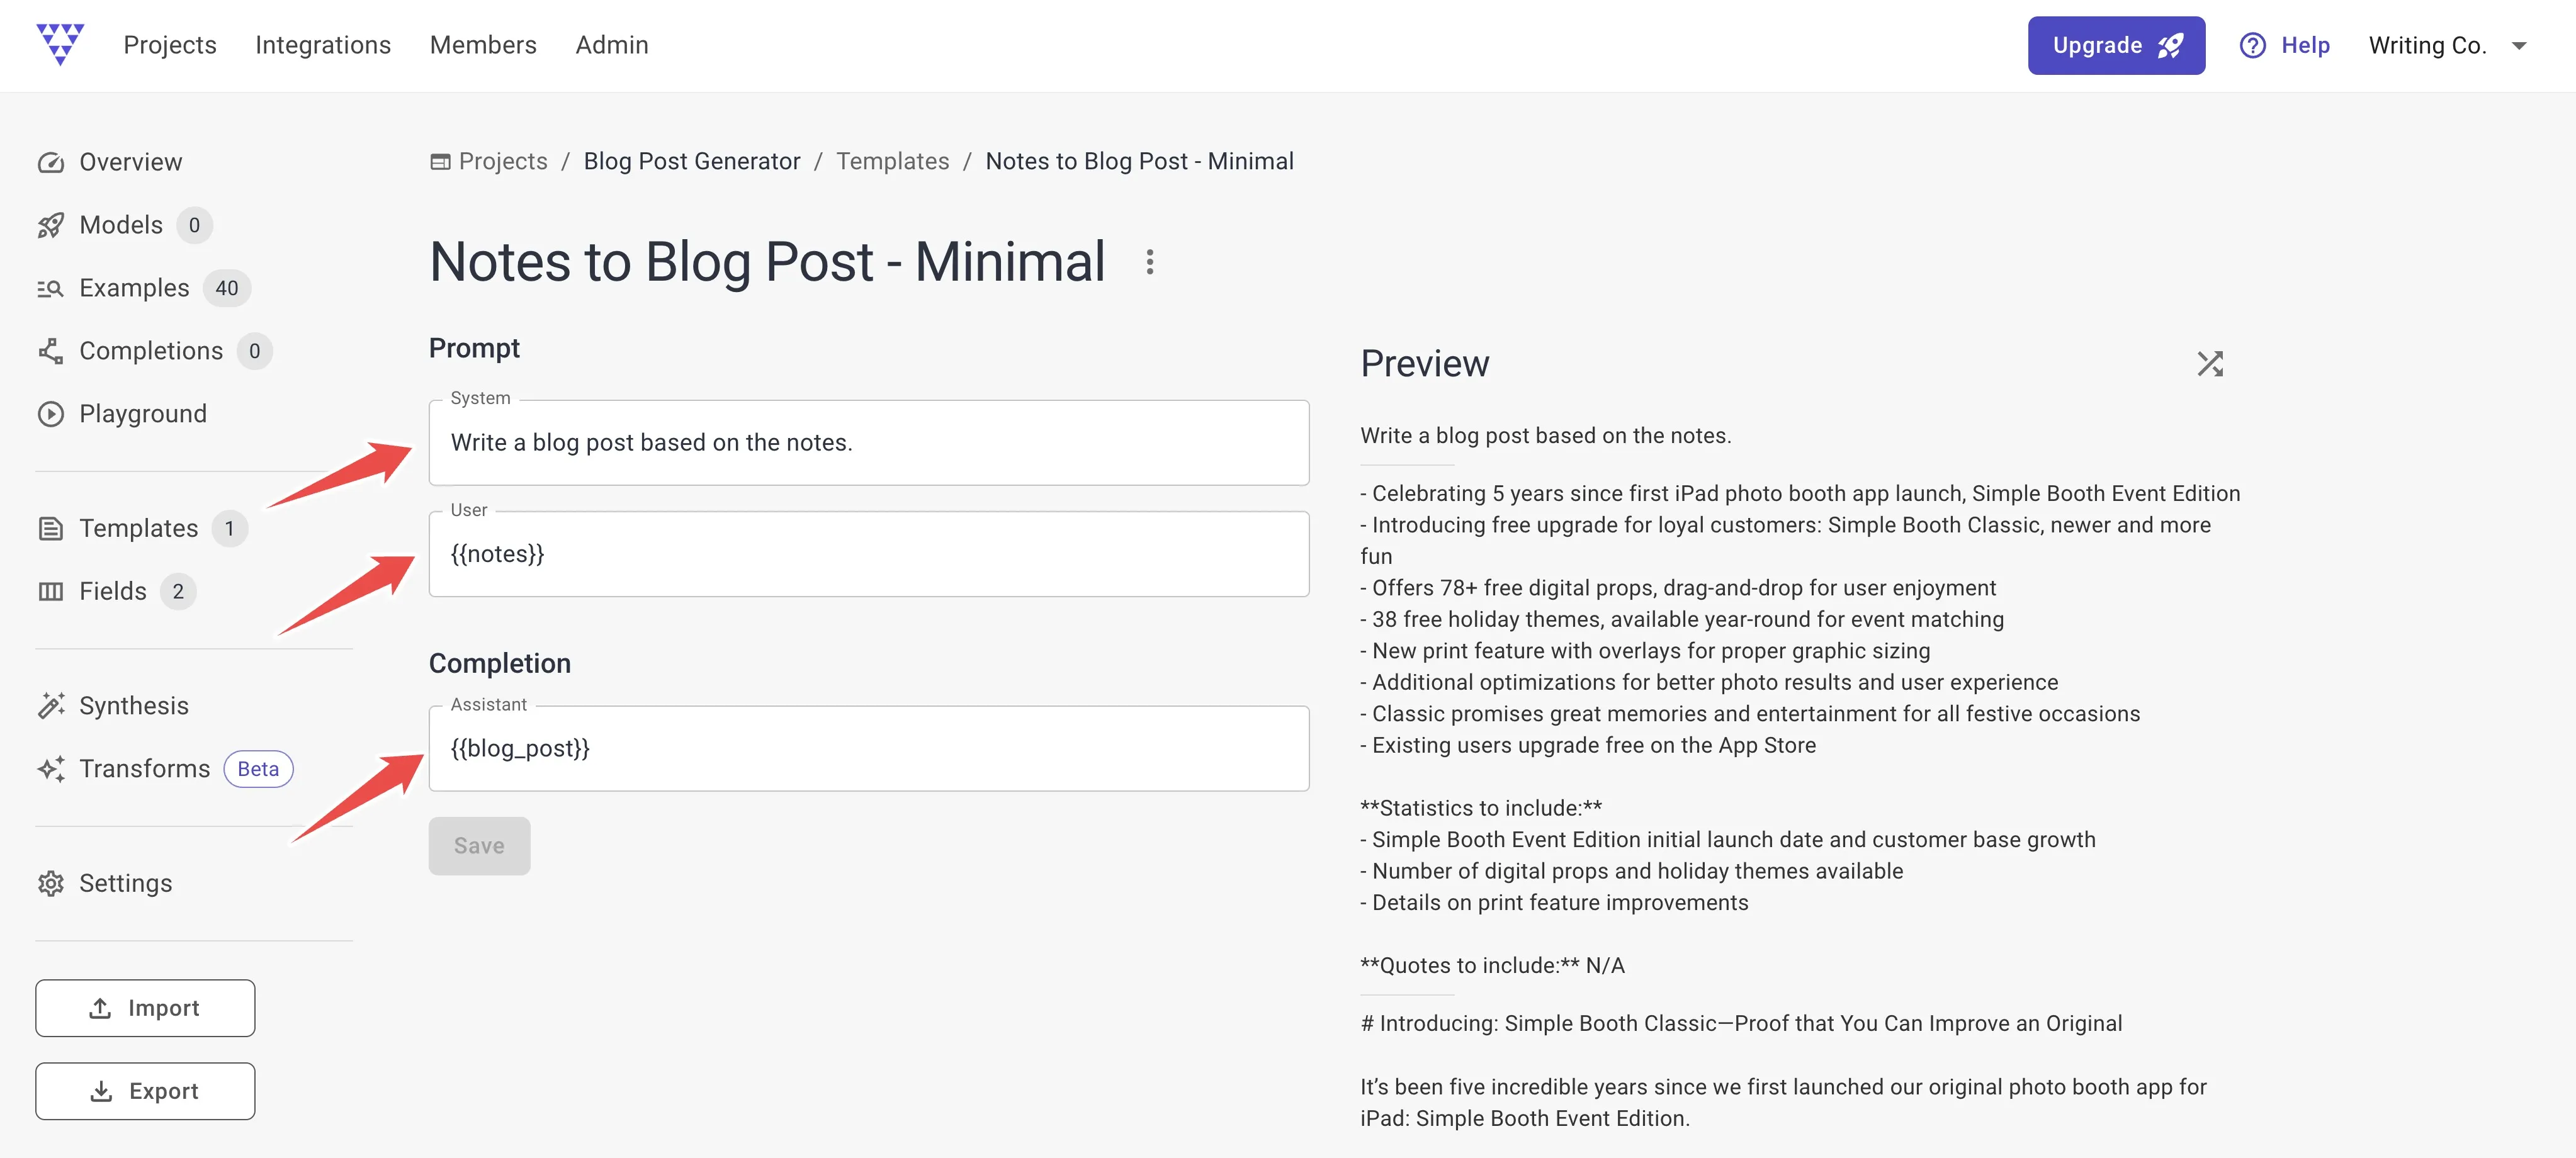
Press save.
5. Start a fine-tune
Now let’s train this AI model!
Go to the Models tab in the sidebar and press the + button. Choose “Start a fine-tune.” The other option, Template a base model, is for comparing prompt templates without fine-tuning a custom model, which we don’t cover in this article.
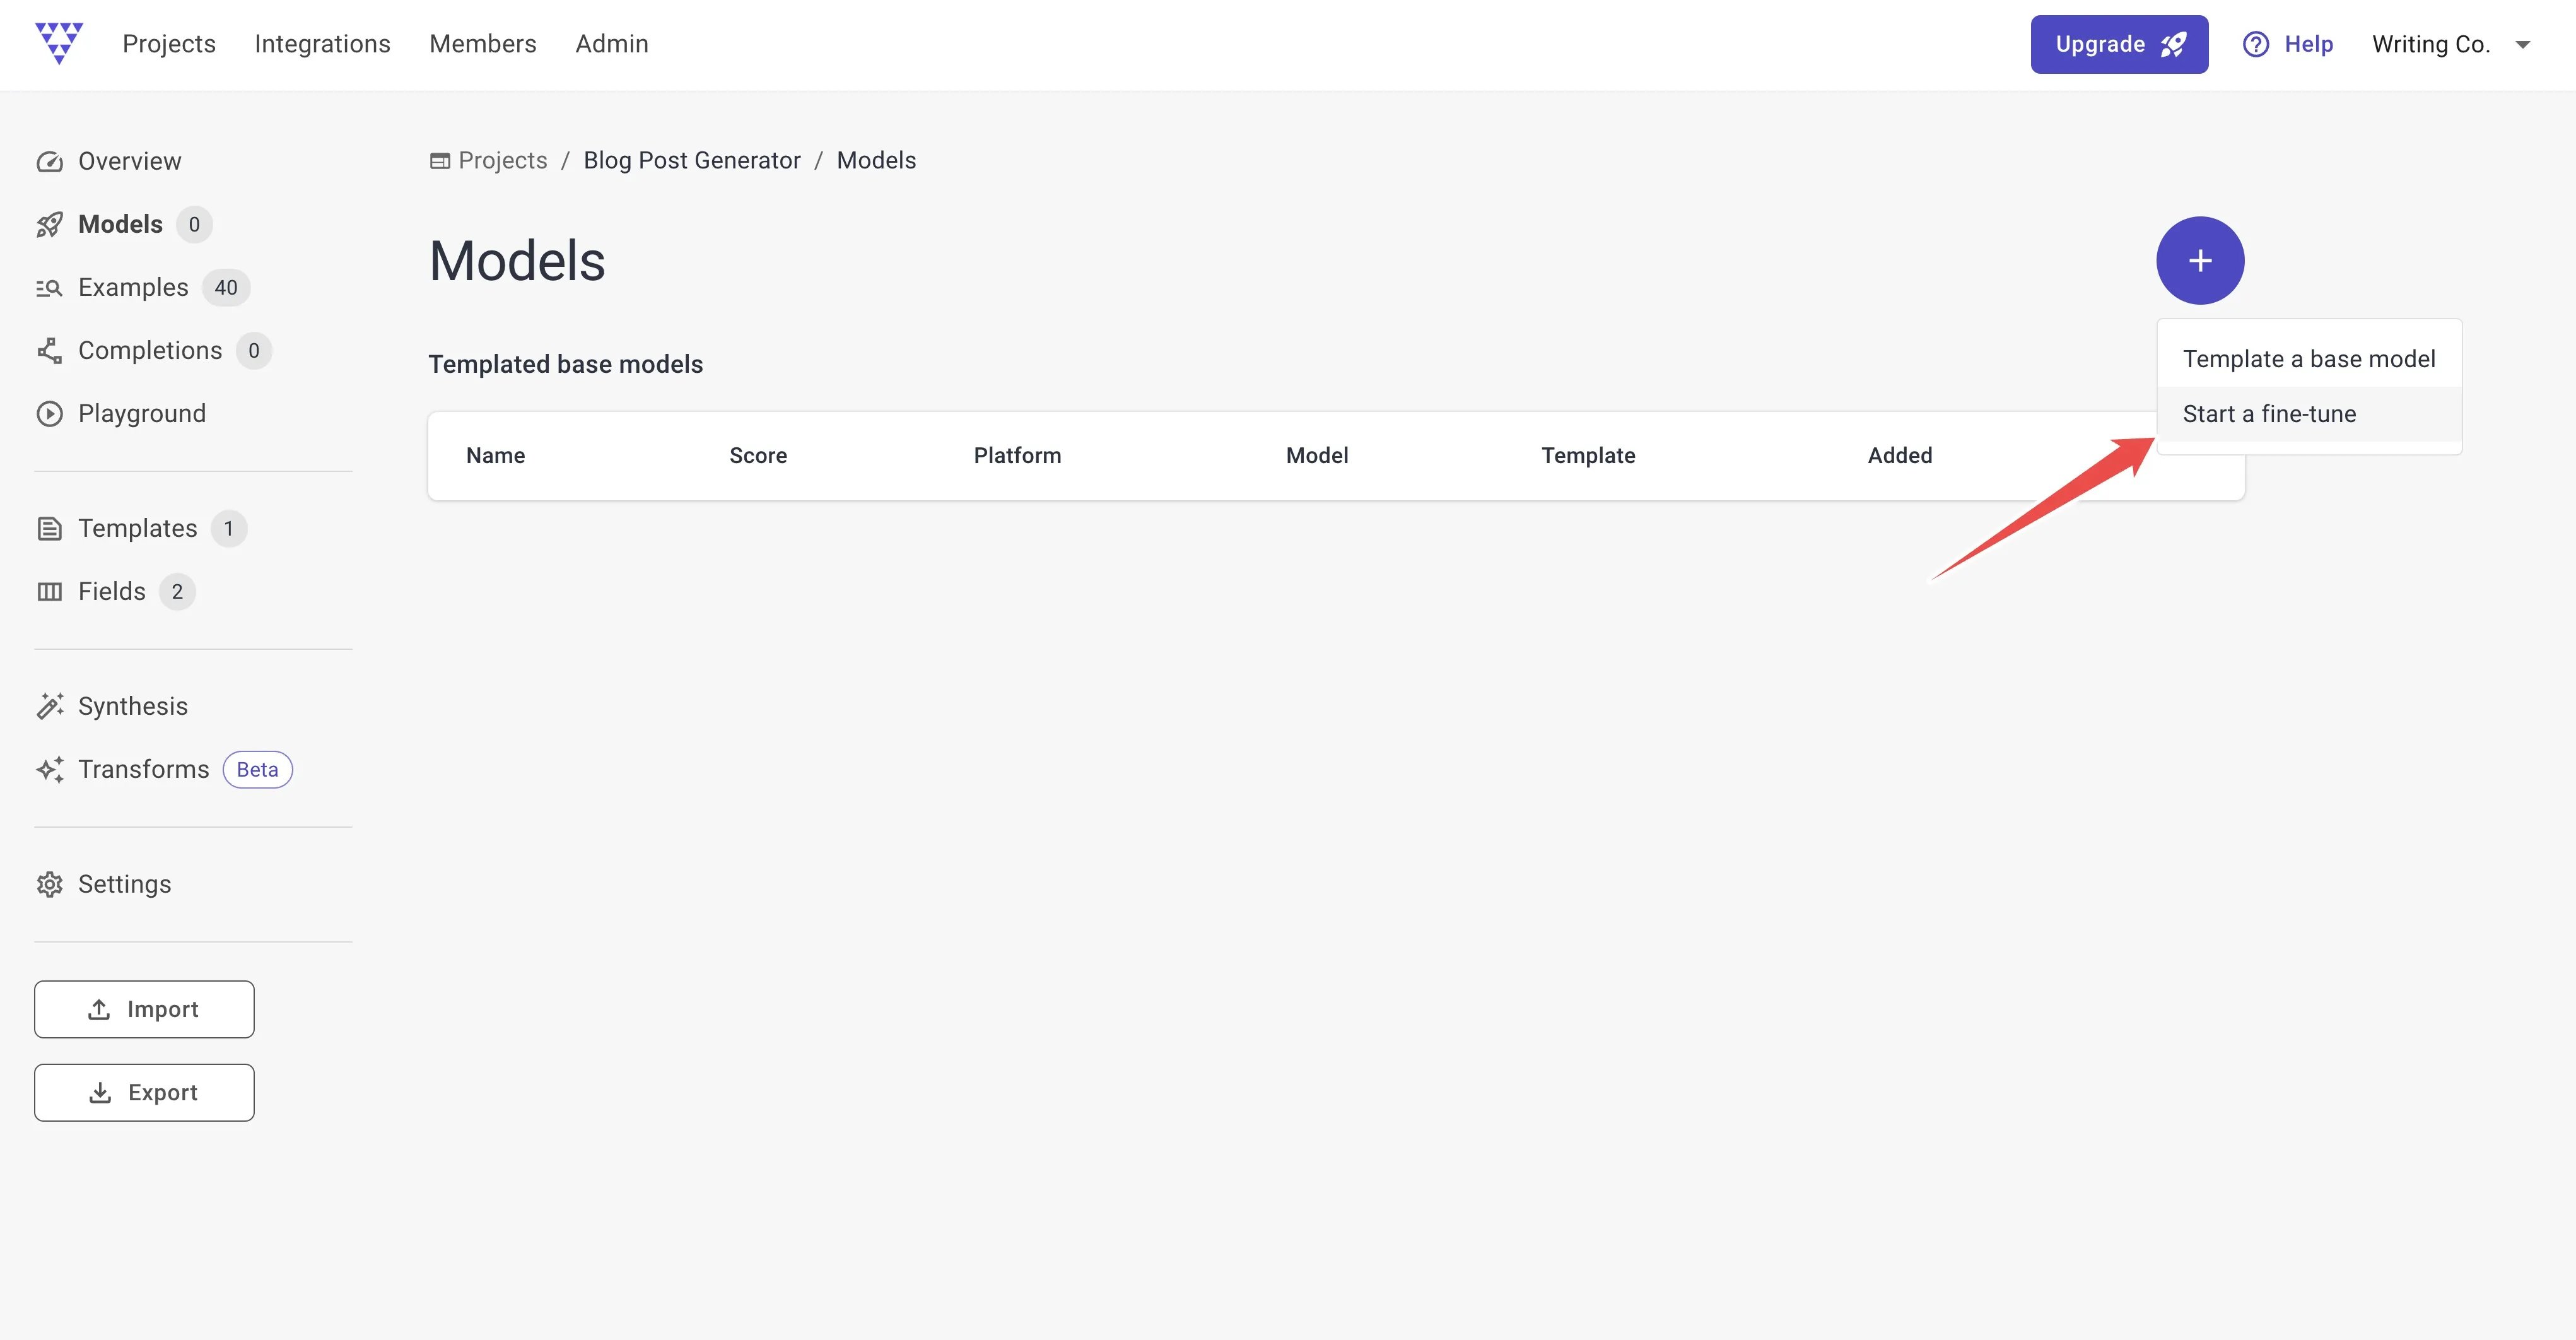
On the next screen, choose the template you just created and GPT-3.5 Turbo.
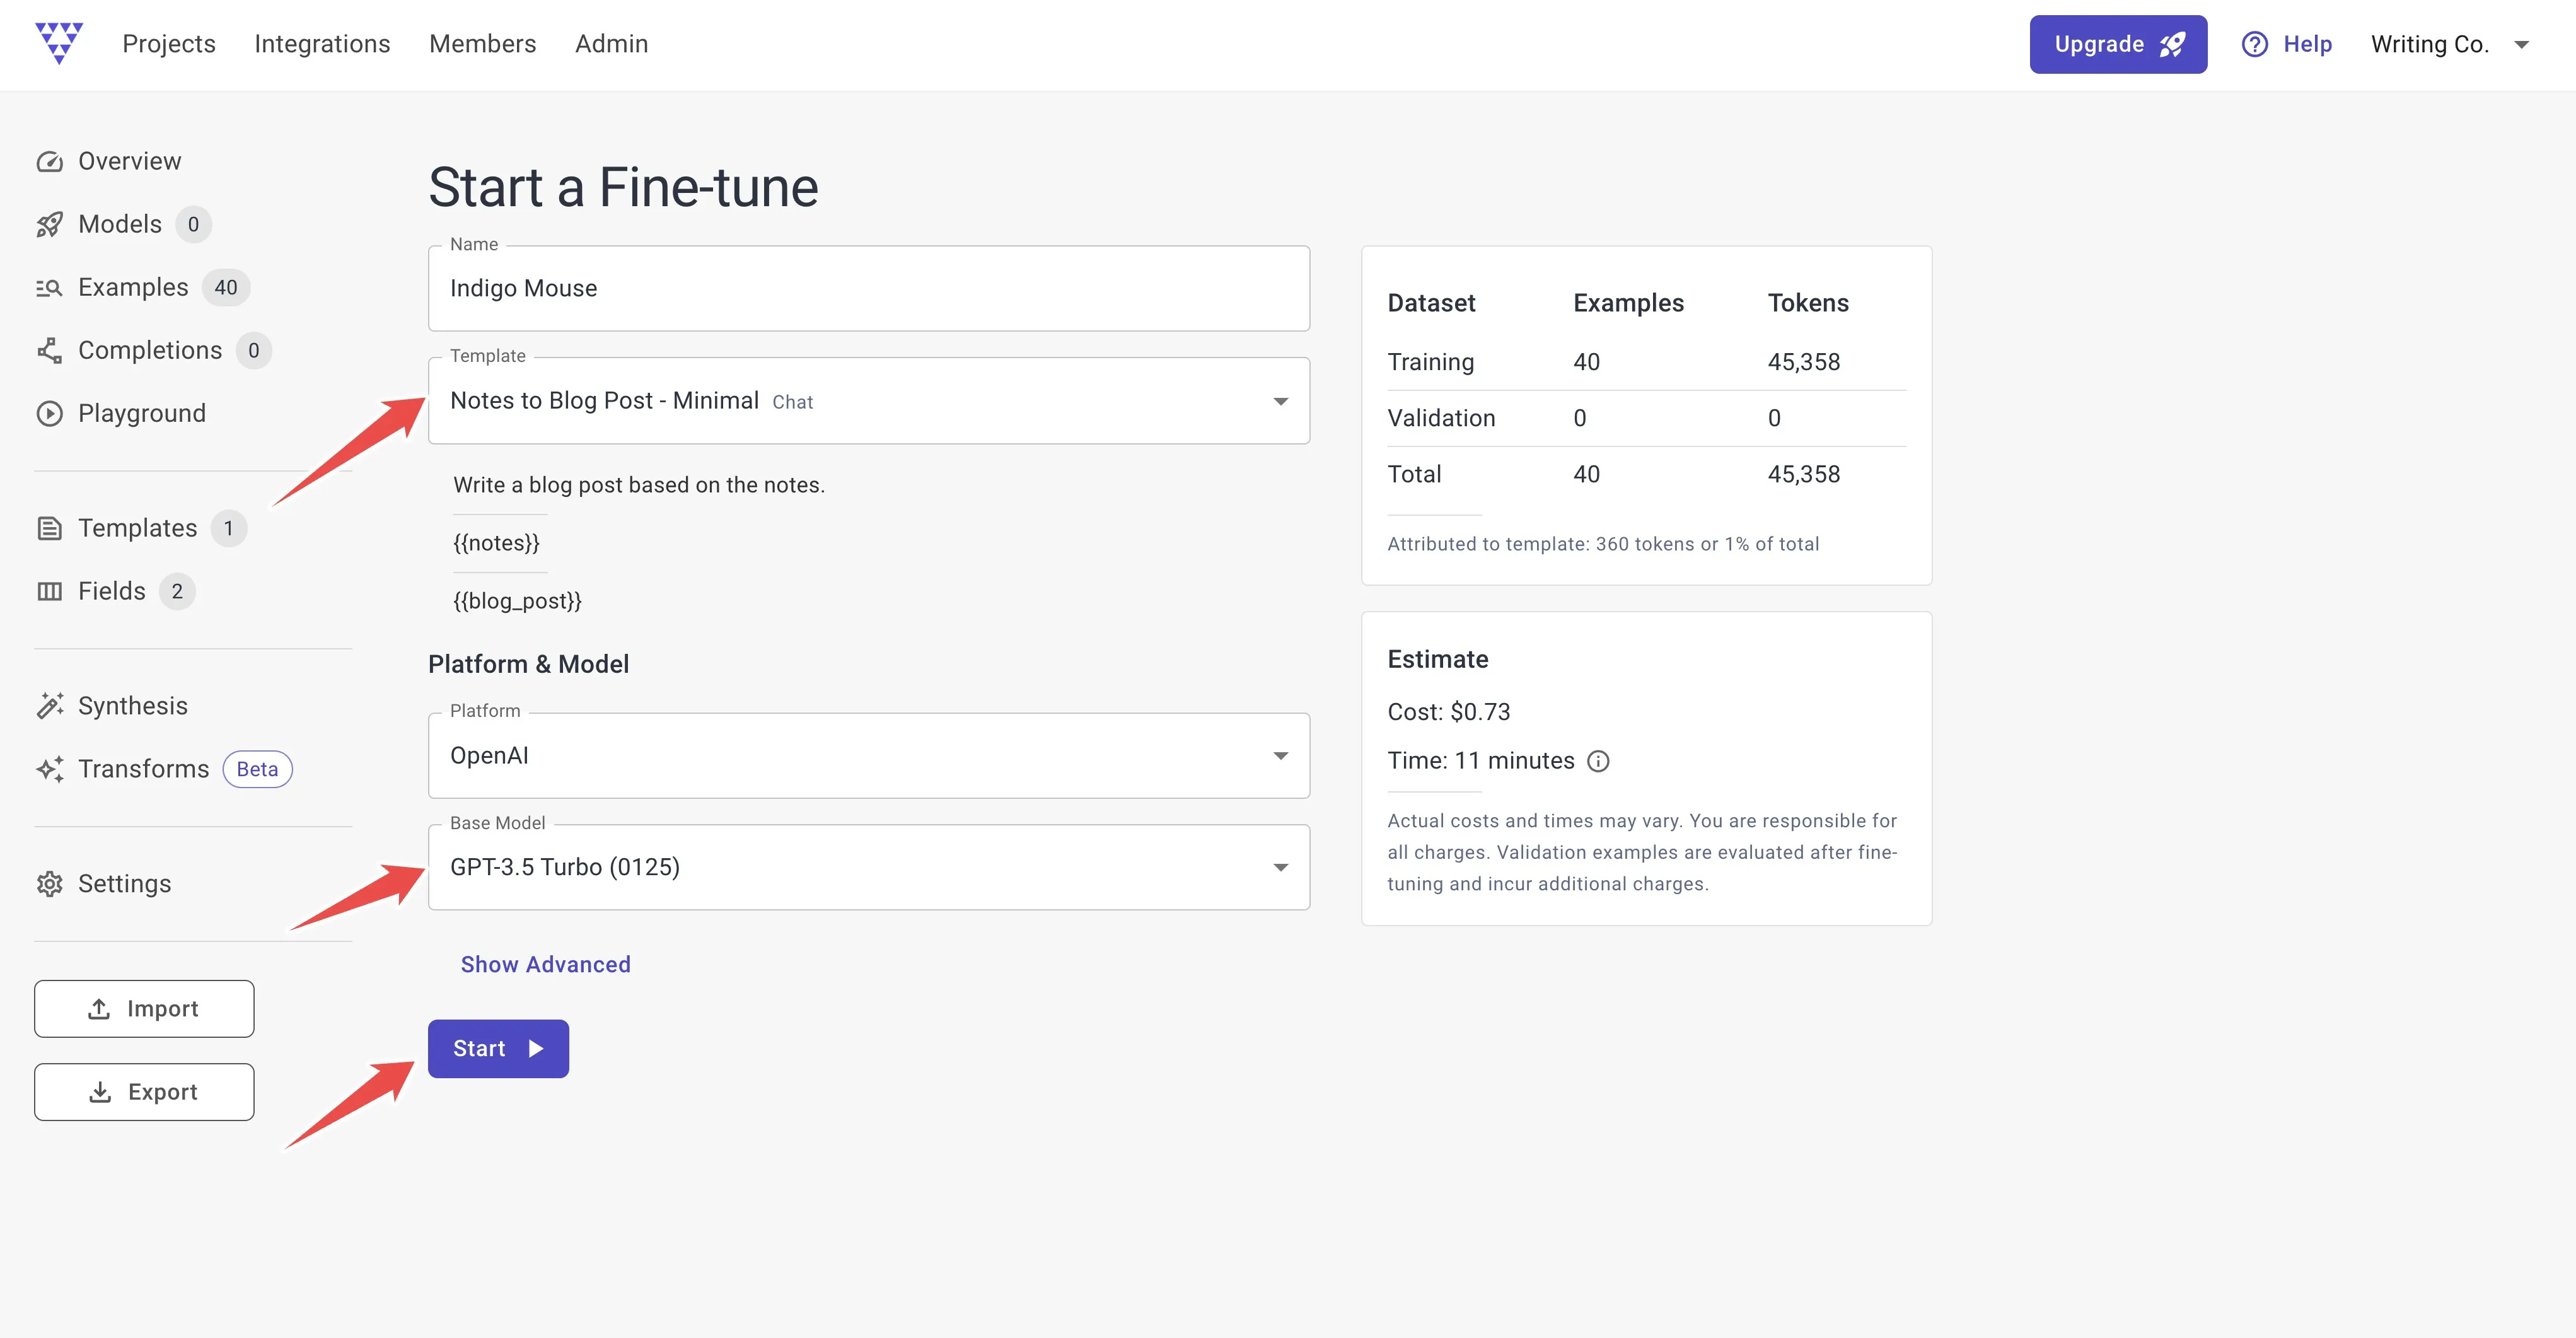
We can leave any other settings at their default values.
Press Start.
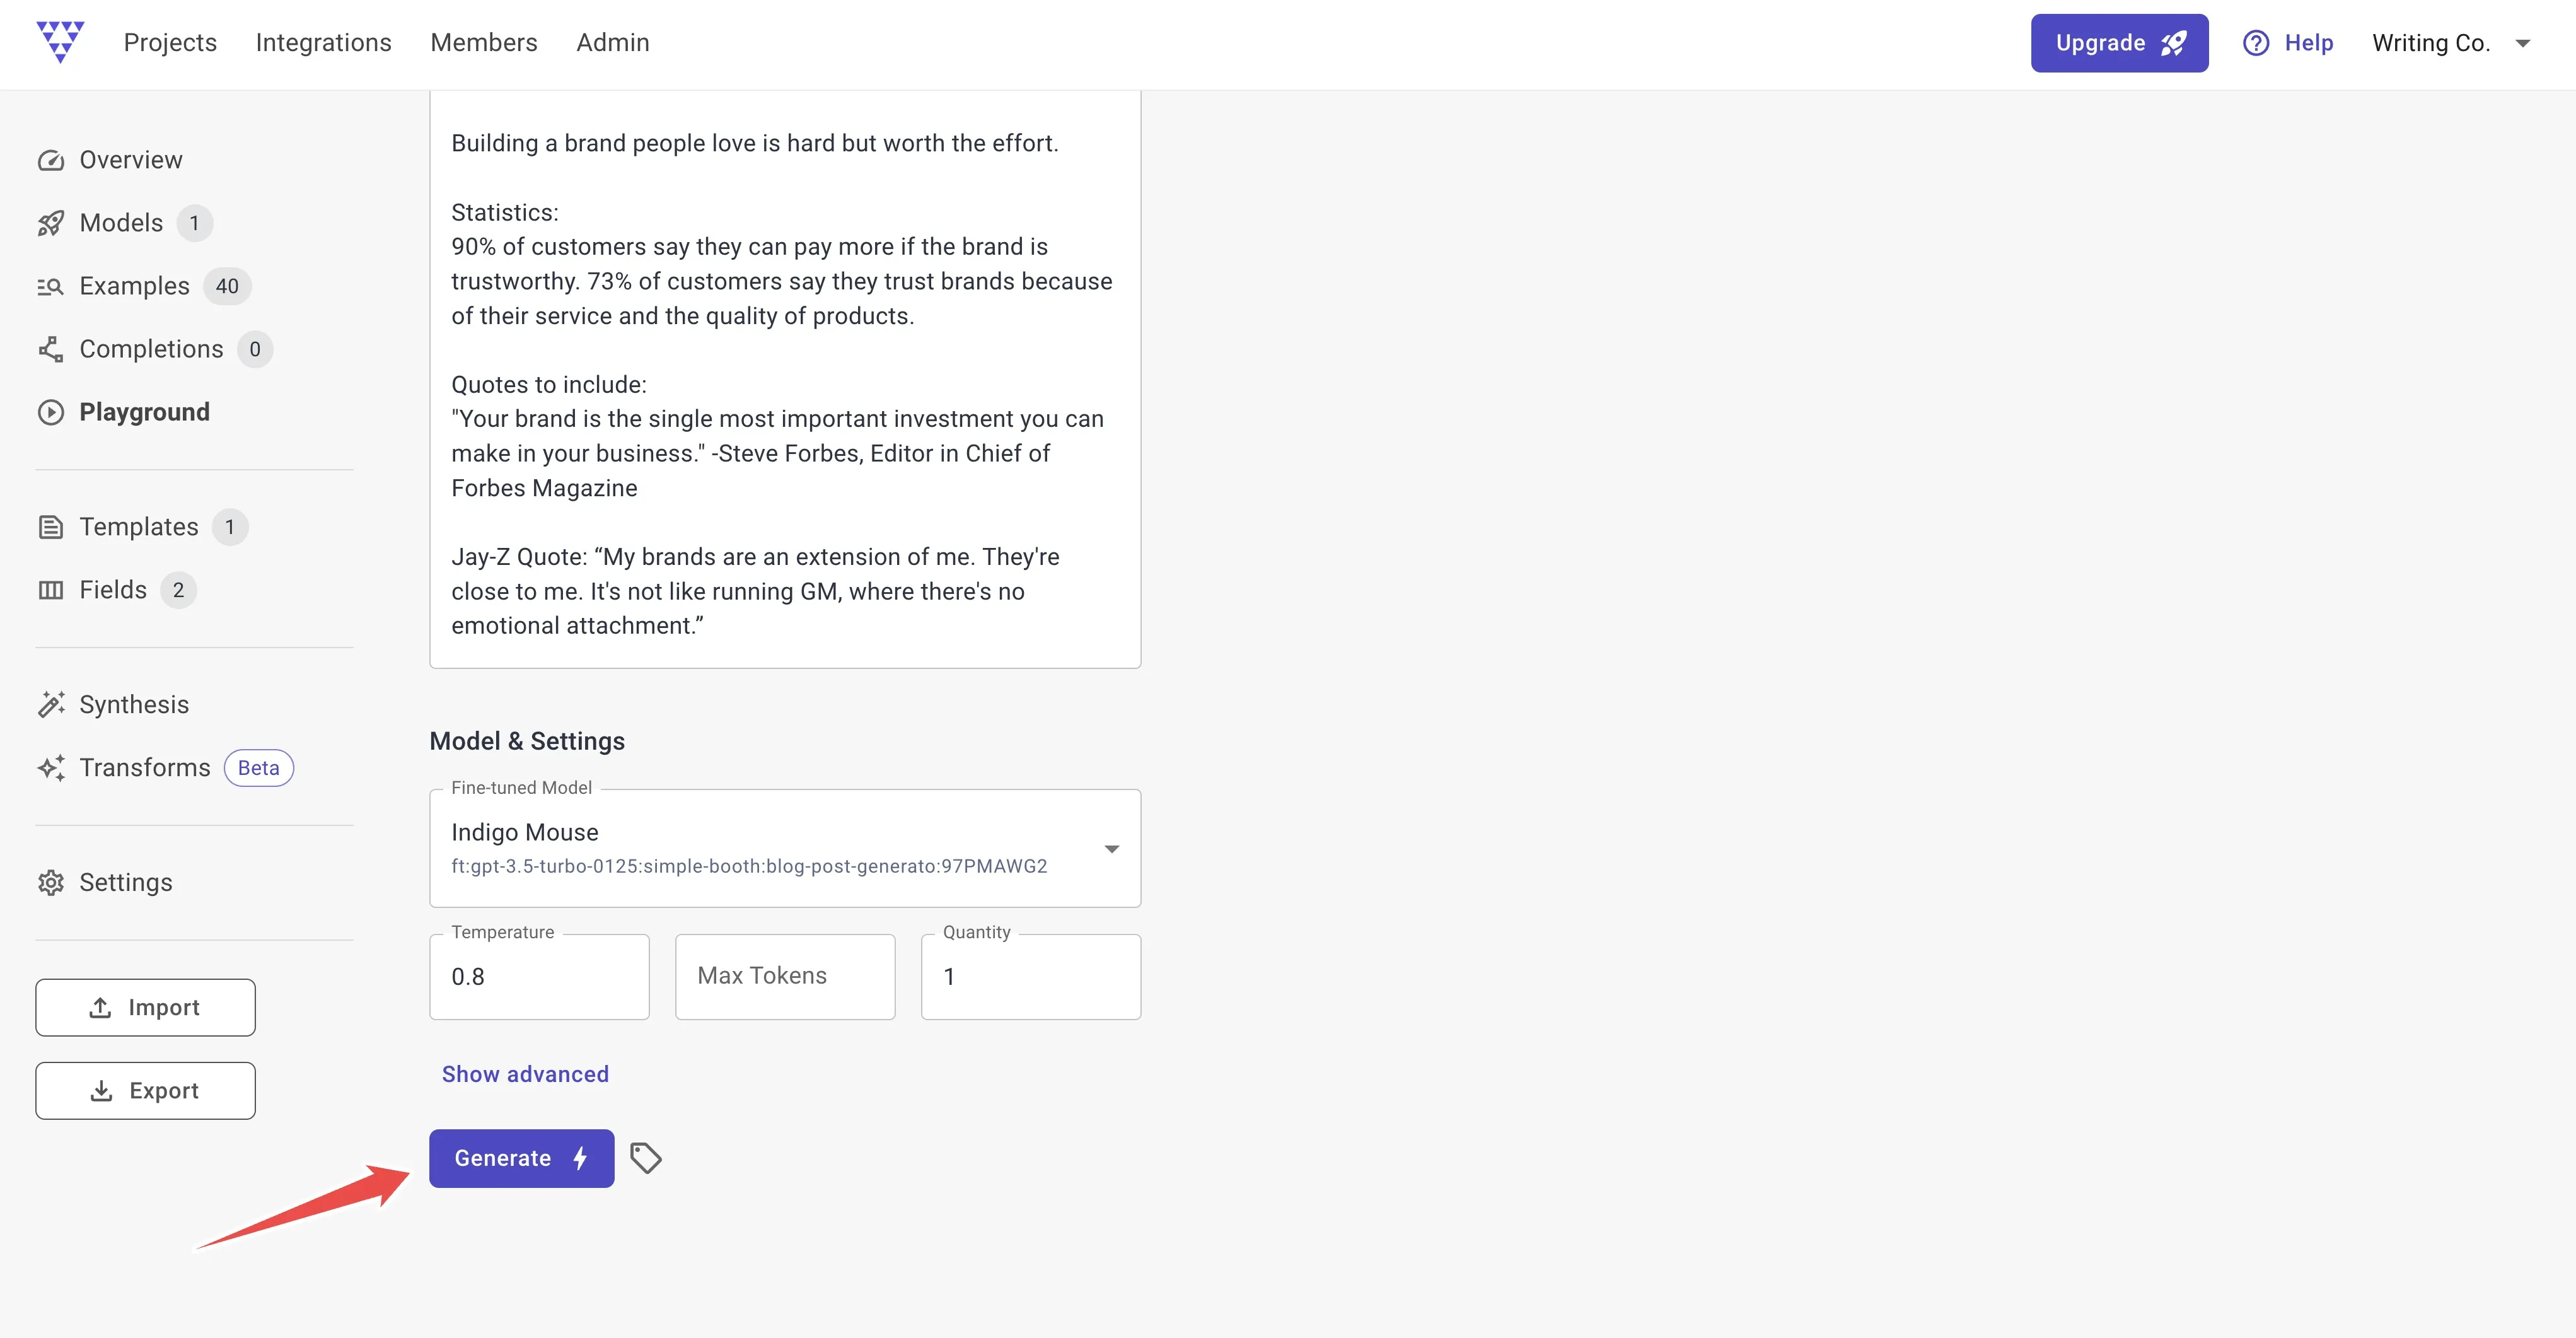
6. Write unlimited blog articles in the playground
When your model finishes fine-tuning, go to the Playground.
Now you can type real notes in the prompt area and generate blog posts!
Make sure to set max tokens to 4,000 so your output doesn’t get cut off. I recommend doing one completion at a time, and experimenting with temperature in the range of 0.6 to 0.8.
When you have some notes and settings to try, just press Generate.
My workflow is to write some notes, generate a post, then get ideas from the post and add them back into my notes. Doing this repeatedly, I can produce a pretty solid article draft in just a few iterations.
It’s hard to believe that a year ago, each of these output drafts would have easily cost me $300-500 if I paid a content writer for them. Now I can produce them for pennies. 🤯
Where to go from here
You may have noticed that your blog writer makes up links and images that don’t exist.
We could go back and use a Transform to clean up our blog posts and remove these, or replace them with more generic placeholders like “[image here].” Basically, the model learns to generate whatever is in your training data, so the more you clean them up to your liking, the better output you’ll get.
Also keep in mind that you should not trust any facts the model states, sources it cites, or quotes it attributes. These are likely made up (hallucinations).
With that in mind, the outputs from these models should be considered rough drafts. They need to be researched, reviewed, and revised before publishing.
Your custom blog generator may not be good at factual articles like “10 real-life examples of brand activations,” but it will be great at general knowledge tasks like “10 benefits of brand activations.”
Also, there are about a million ways you could configure your fields to steer your content. Instead of just the “notes” field, you could add a “topic” field, give it the “title” you want ot use, add a dropdown for “category,” have an “SEO keywords” list, or provide a complete blog outline in an “outline” field for max steerability and control.
Beyond the fields you can customize, consider if you trained two separate models:
-
One to generate a blog outline from your rough notes and ideas
-
Another to turn the outline into a post in your style
Having the separation between these steps would allow you to make modifications before the final article and get even more predictable outputs.
The possibilities are unlimited!
AI content writing in the future
If you can get awesome results with this method using GPT-3.5 Turbo, you’ll be able to get even better results in the future with more advanced models as they become available for fine-tuning. You’ll get an instant upgrade and it will be even more amazing.
At the same time, this is uncharted territory. Think about it: by following this guide, you are one of the first people in the world to have this kind of content-creation power.
There are a lot of unknowns. What does content creation look like in a year from now? Is the internet going to be flooded with these types of articles (is it already)?
At any rate, it’s a good time to be an early adopter.
Entry Point AI provides the tooling that allows you to iterate rapidly with AI content creation and find what works best for your organization.
Thanks for reading. If I literally just gave you a superpower, please subscribe to a paid Entry Point plan to help us create even more guides like this!